CTS User Guide
Table of Contents
Overview
The Catapult Content Test Suite (CTS) is a web application for content developers and testers who need to verify that their content is conformant with the cmi5 specification. This guide is for those users, who are assumed to be somewhat familiar with cmi5, and also with the xAPI specification. Other types of cmi5 users, particularly learners, do not need to use the CTS.
The Tutorial section will guide you through signing into the CTS for the first time, adding a course, testing it, and downloading the test report. The Reference section goes into more details about different parts of the application.
Tutorial
This tutorial will guide you through your first steps using the Catapult CTS. It covers signing in, importing a course, starting a conformance test, and launching assignable units (AUs). Before working through this tutorial, you should have access to an instance of the CTS web application. If there is not a hosted instance available for your use, you may wish to host a local instance on your own computer. See the CTS README file for more information.
Signing In
To use the Catapult CTS, you must first sign in. The username and password that you use to do this will depend on whether you’re using a local instance of the CTS on your own computer, or a hosted instance that someone else is administering.
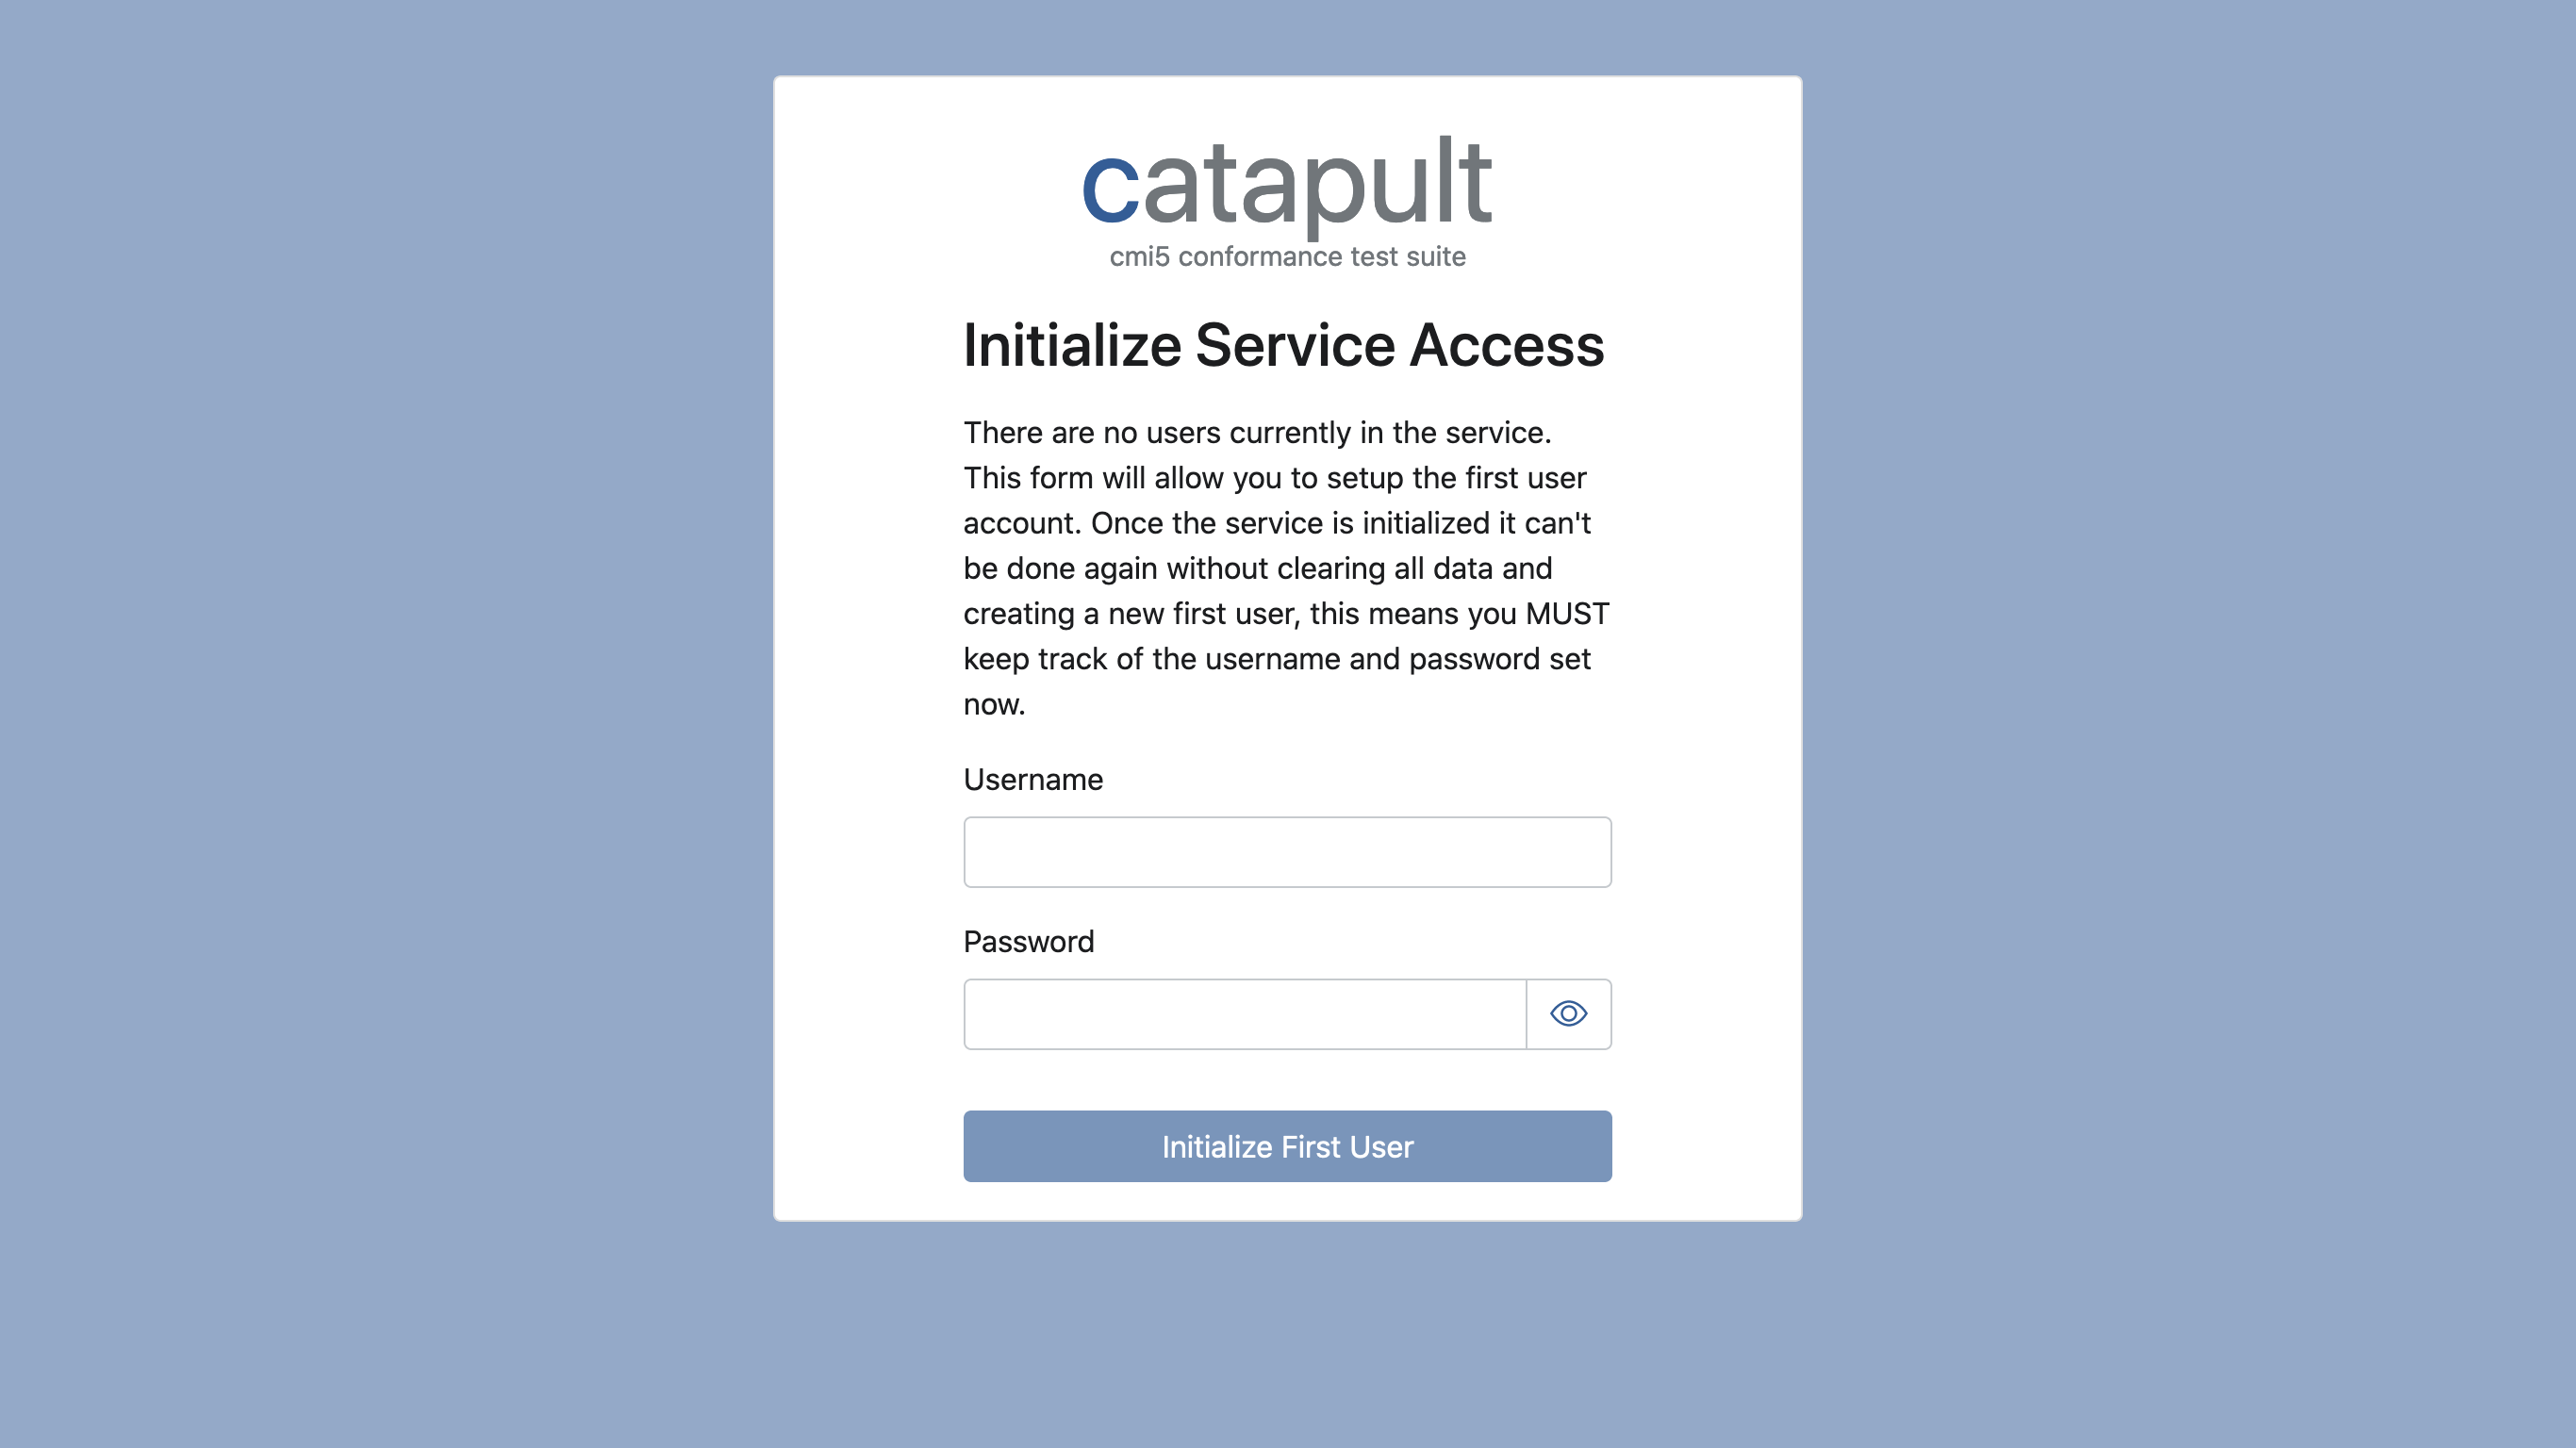
If you are using a local instance of the CTS: You will be prompted to provide a username and password the first time that you attempt to sign in. Enter a new username and password, then click the “Initialize First User” button to proceed to the sign in page.
If you are using a hosted instance of the CTS: Your system administrator will provide you with a username and password, and the address of the instance’s sign in page.
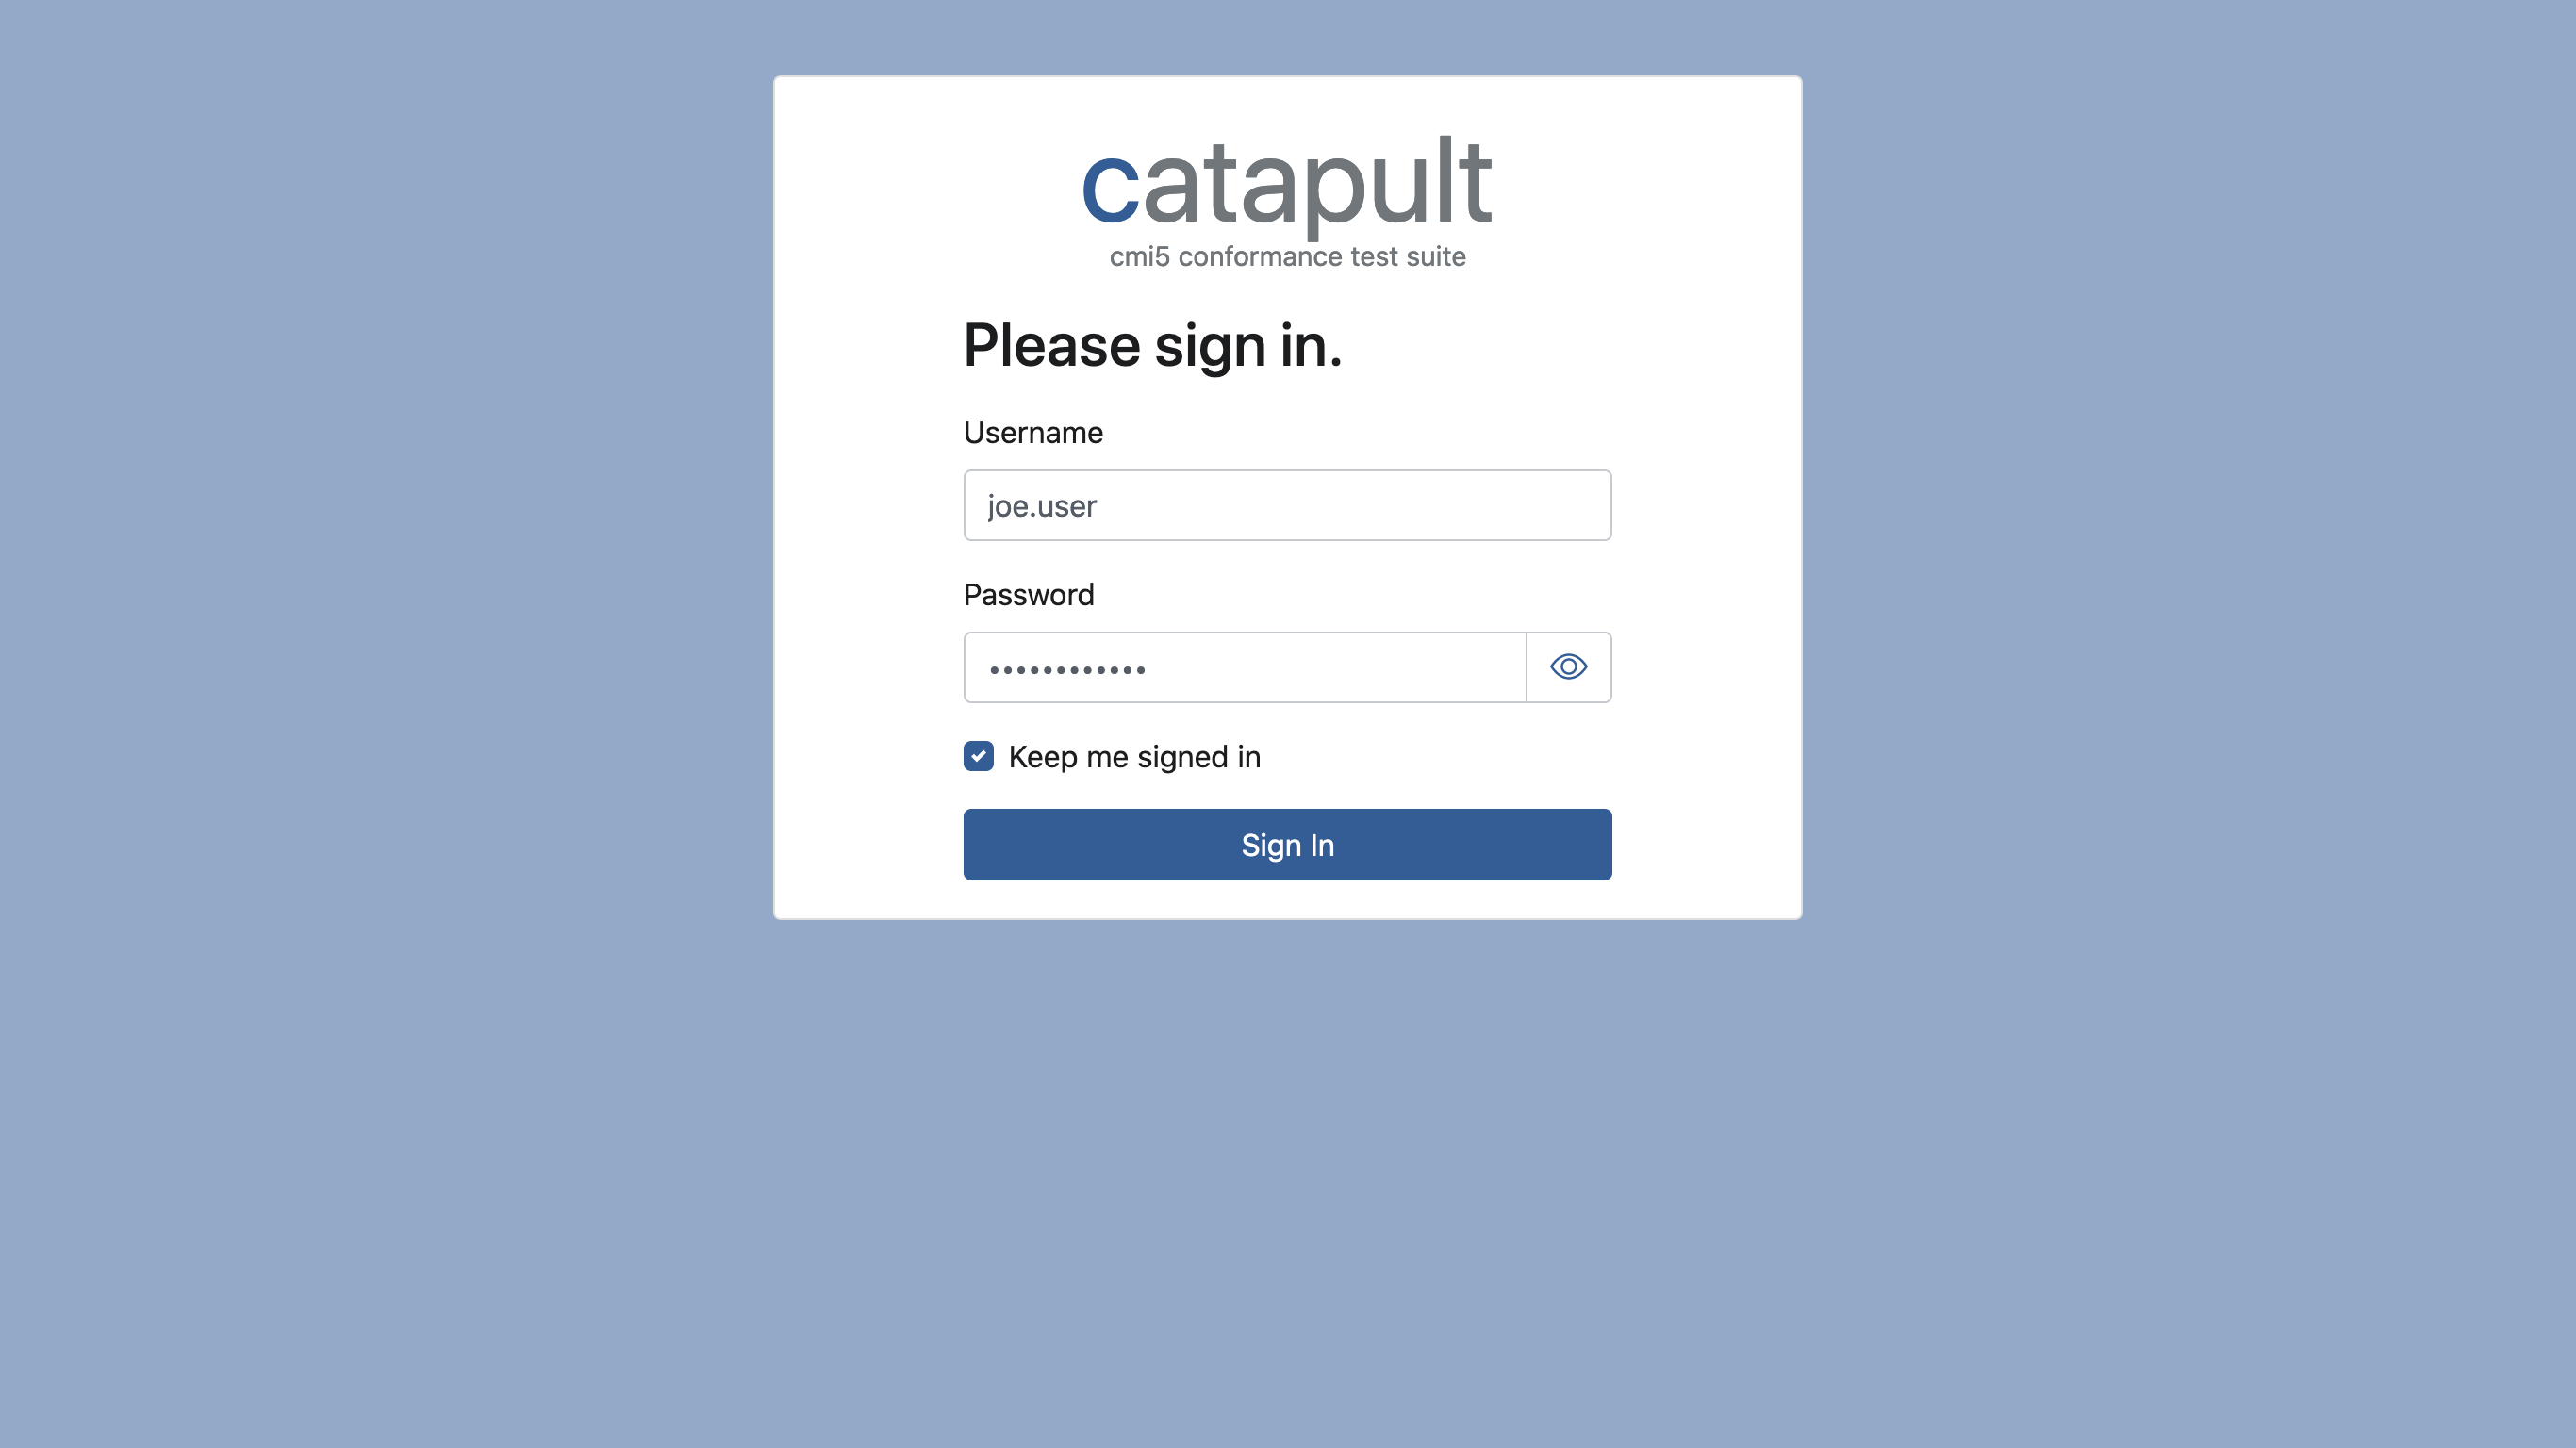
Once you have your username and password:
- Go to the sign in page URL in your web browser.
- Enter your username and password.
- Click the “Sign In” button.
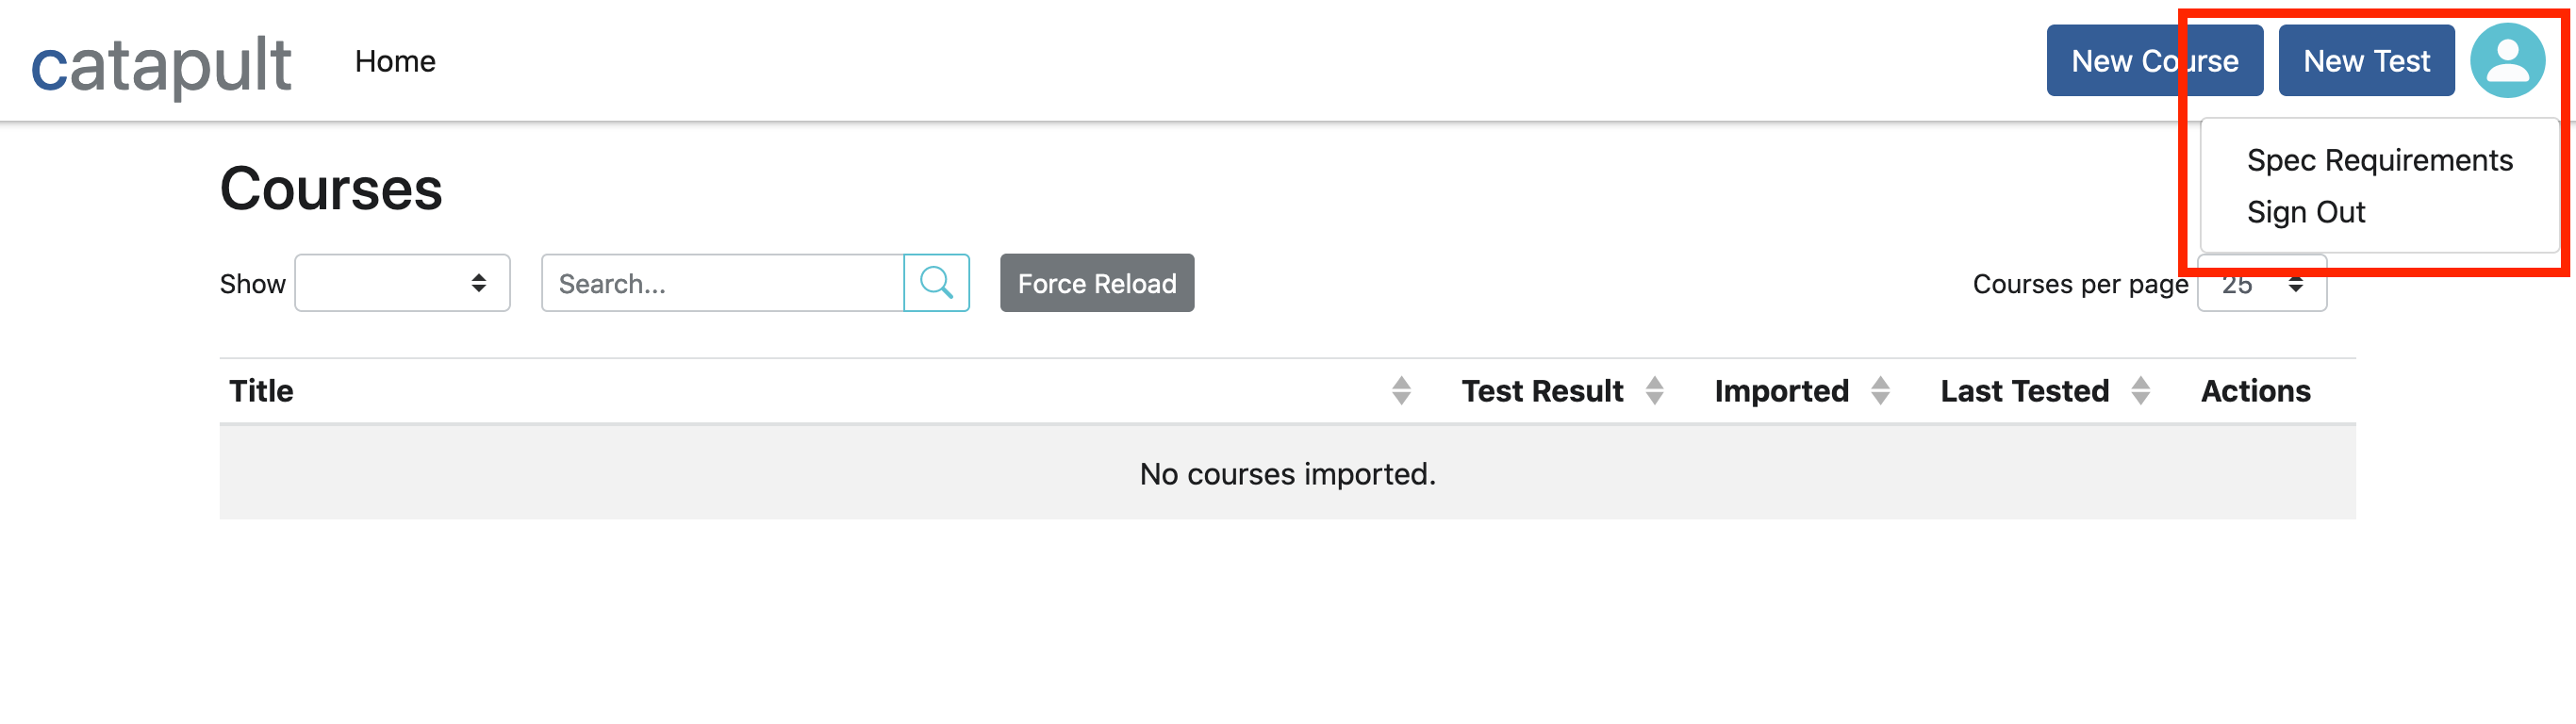
After logging in, you should see a navigation bar at the top of the browser window. On the right side of the navigation bar are three buttons: “New Course”, “New Test”, and a round “User” button.

To sign out of the Catapult CTS: Click the round “User” button on the top navigation bar, then select “Sign Out” from the drop-down menu.
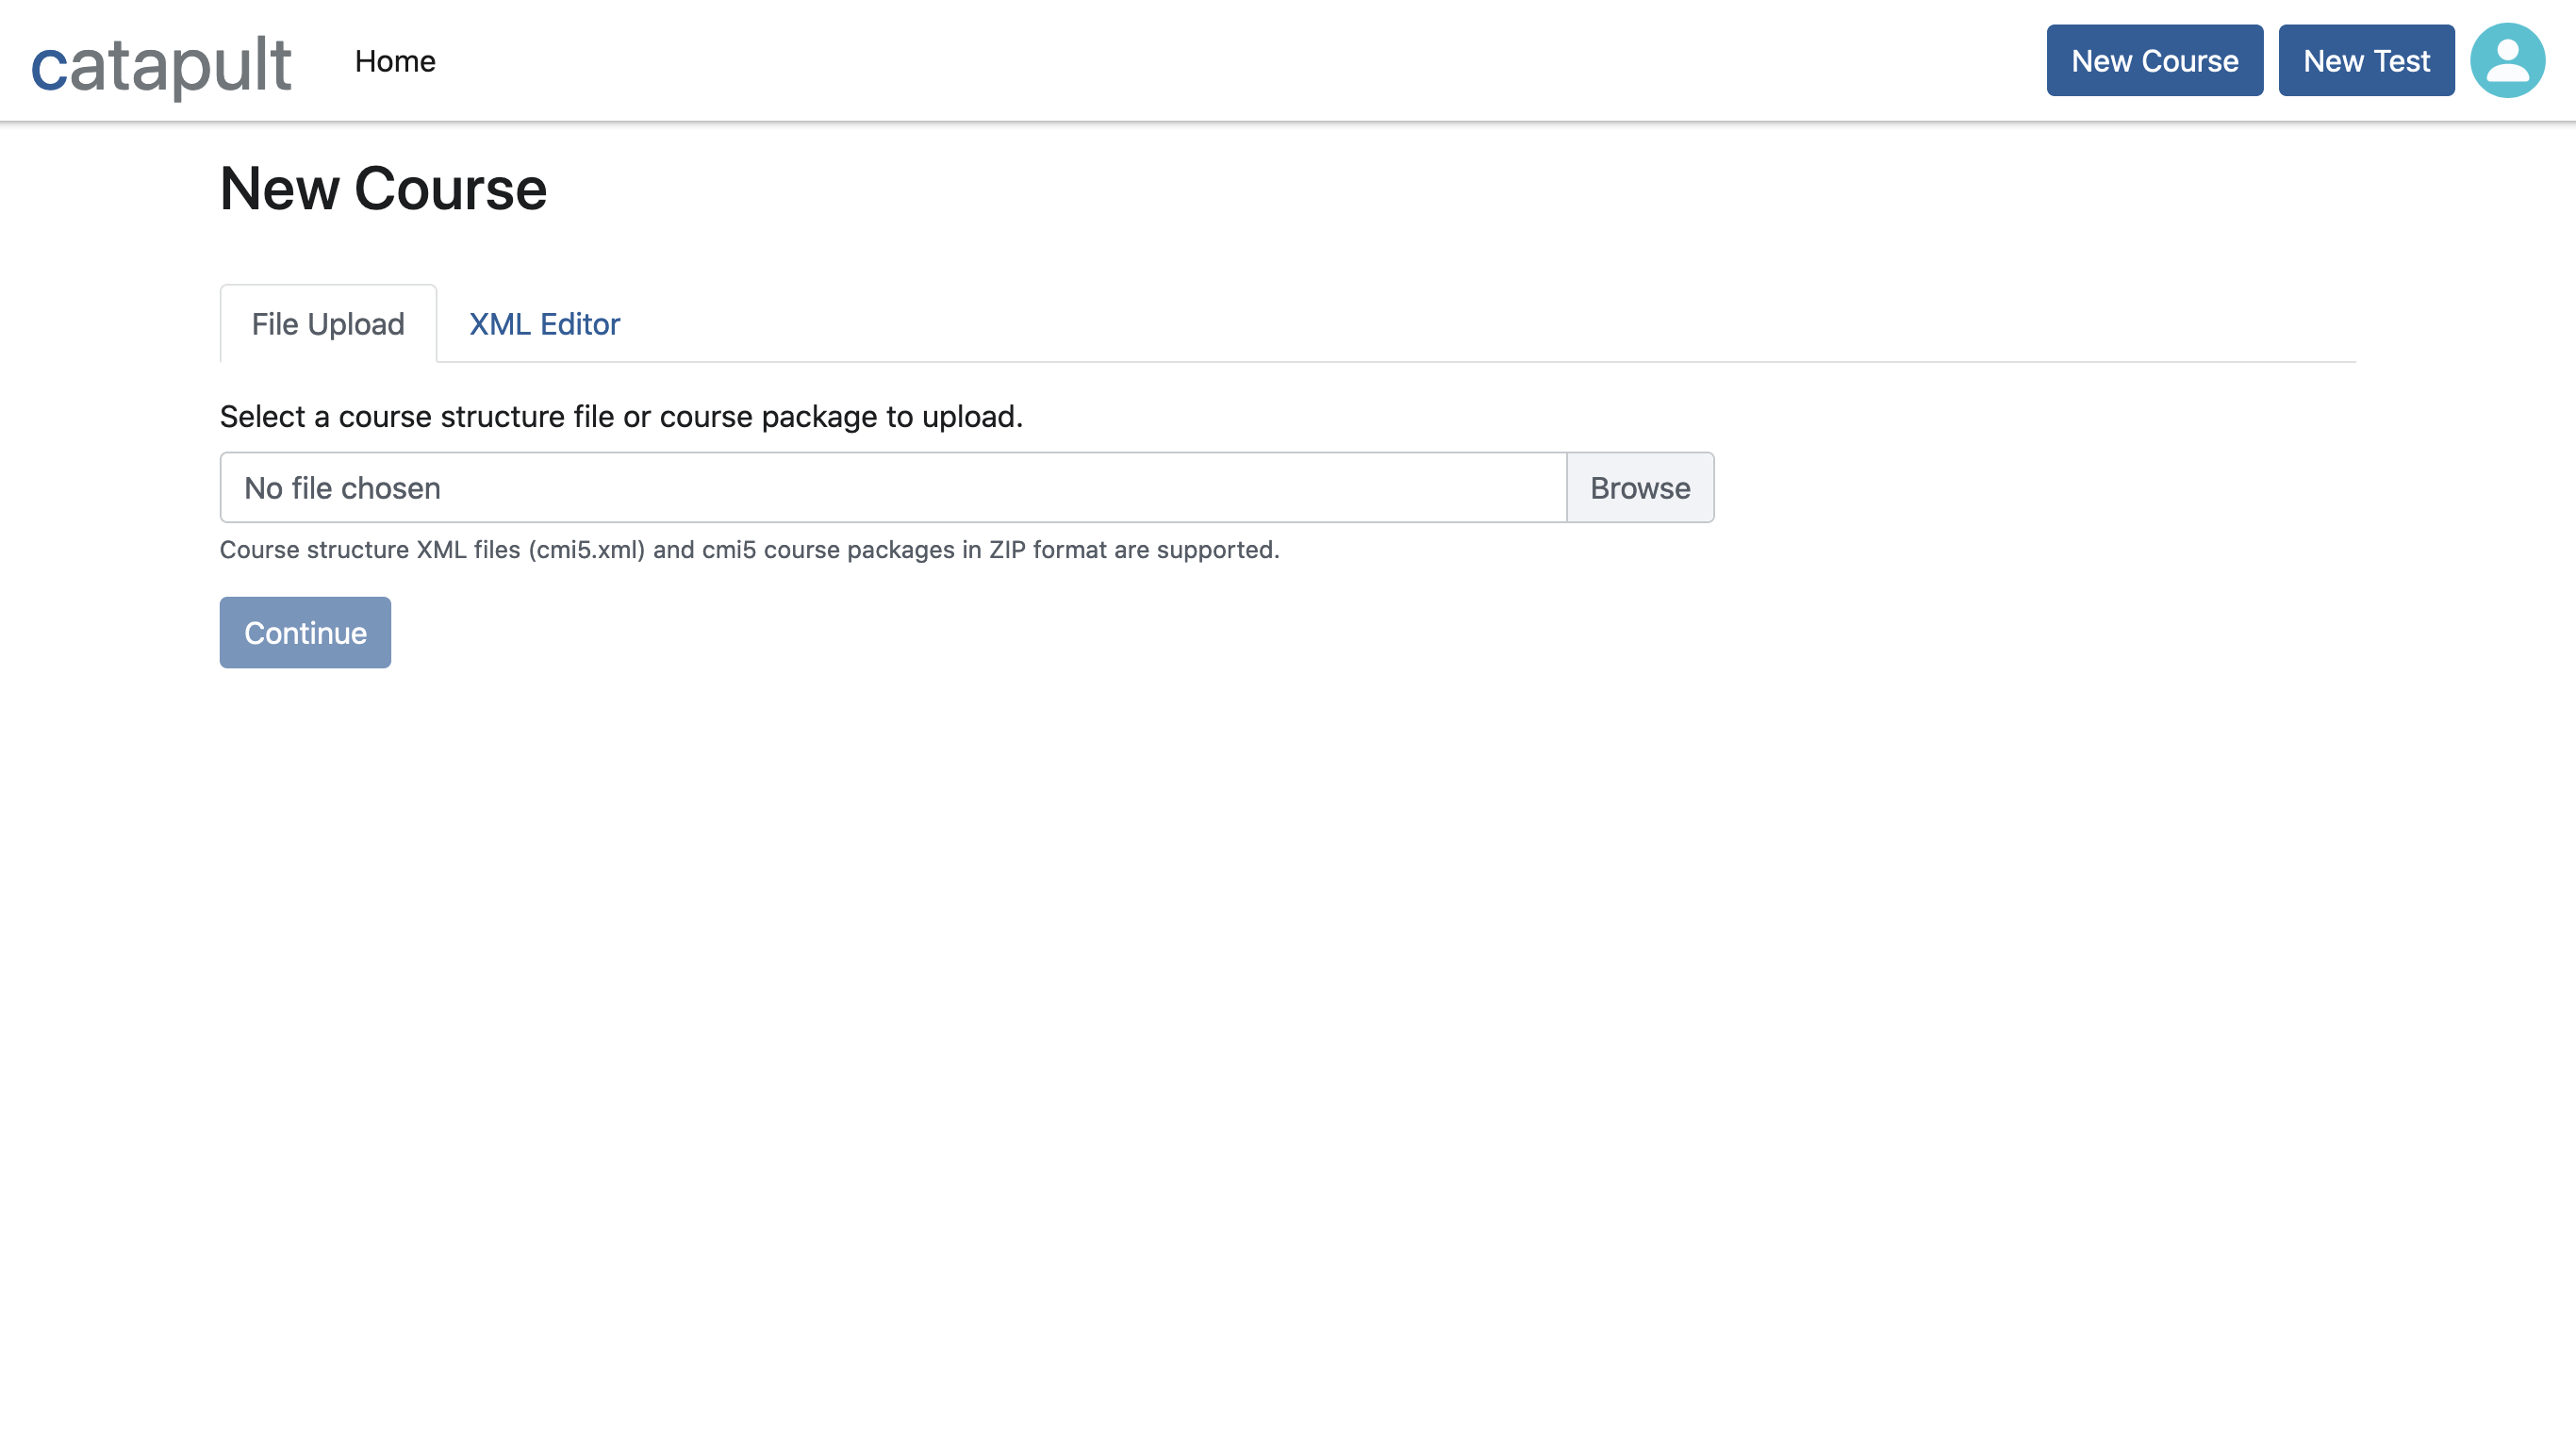
Adding a Course
After signing in, you’re now able to add a course to the CTS for testing. To do this, click the “New Course” button on the top navigation bar, which will open the New Course page. From here, you can upload a cmi5 course package or a cmi5.xml course structure file.
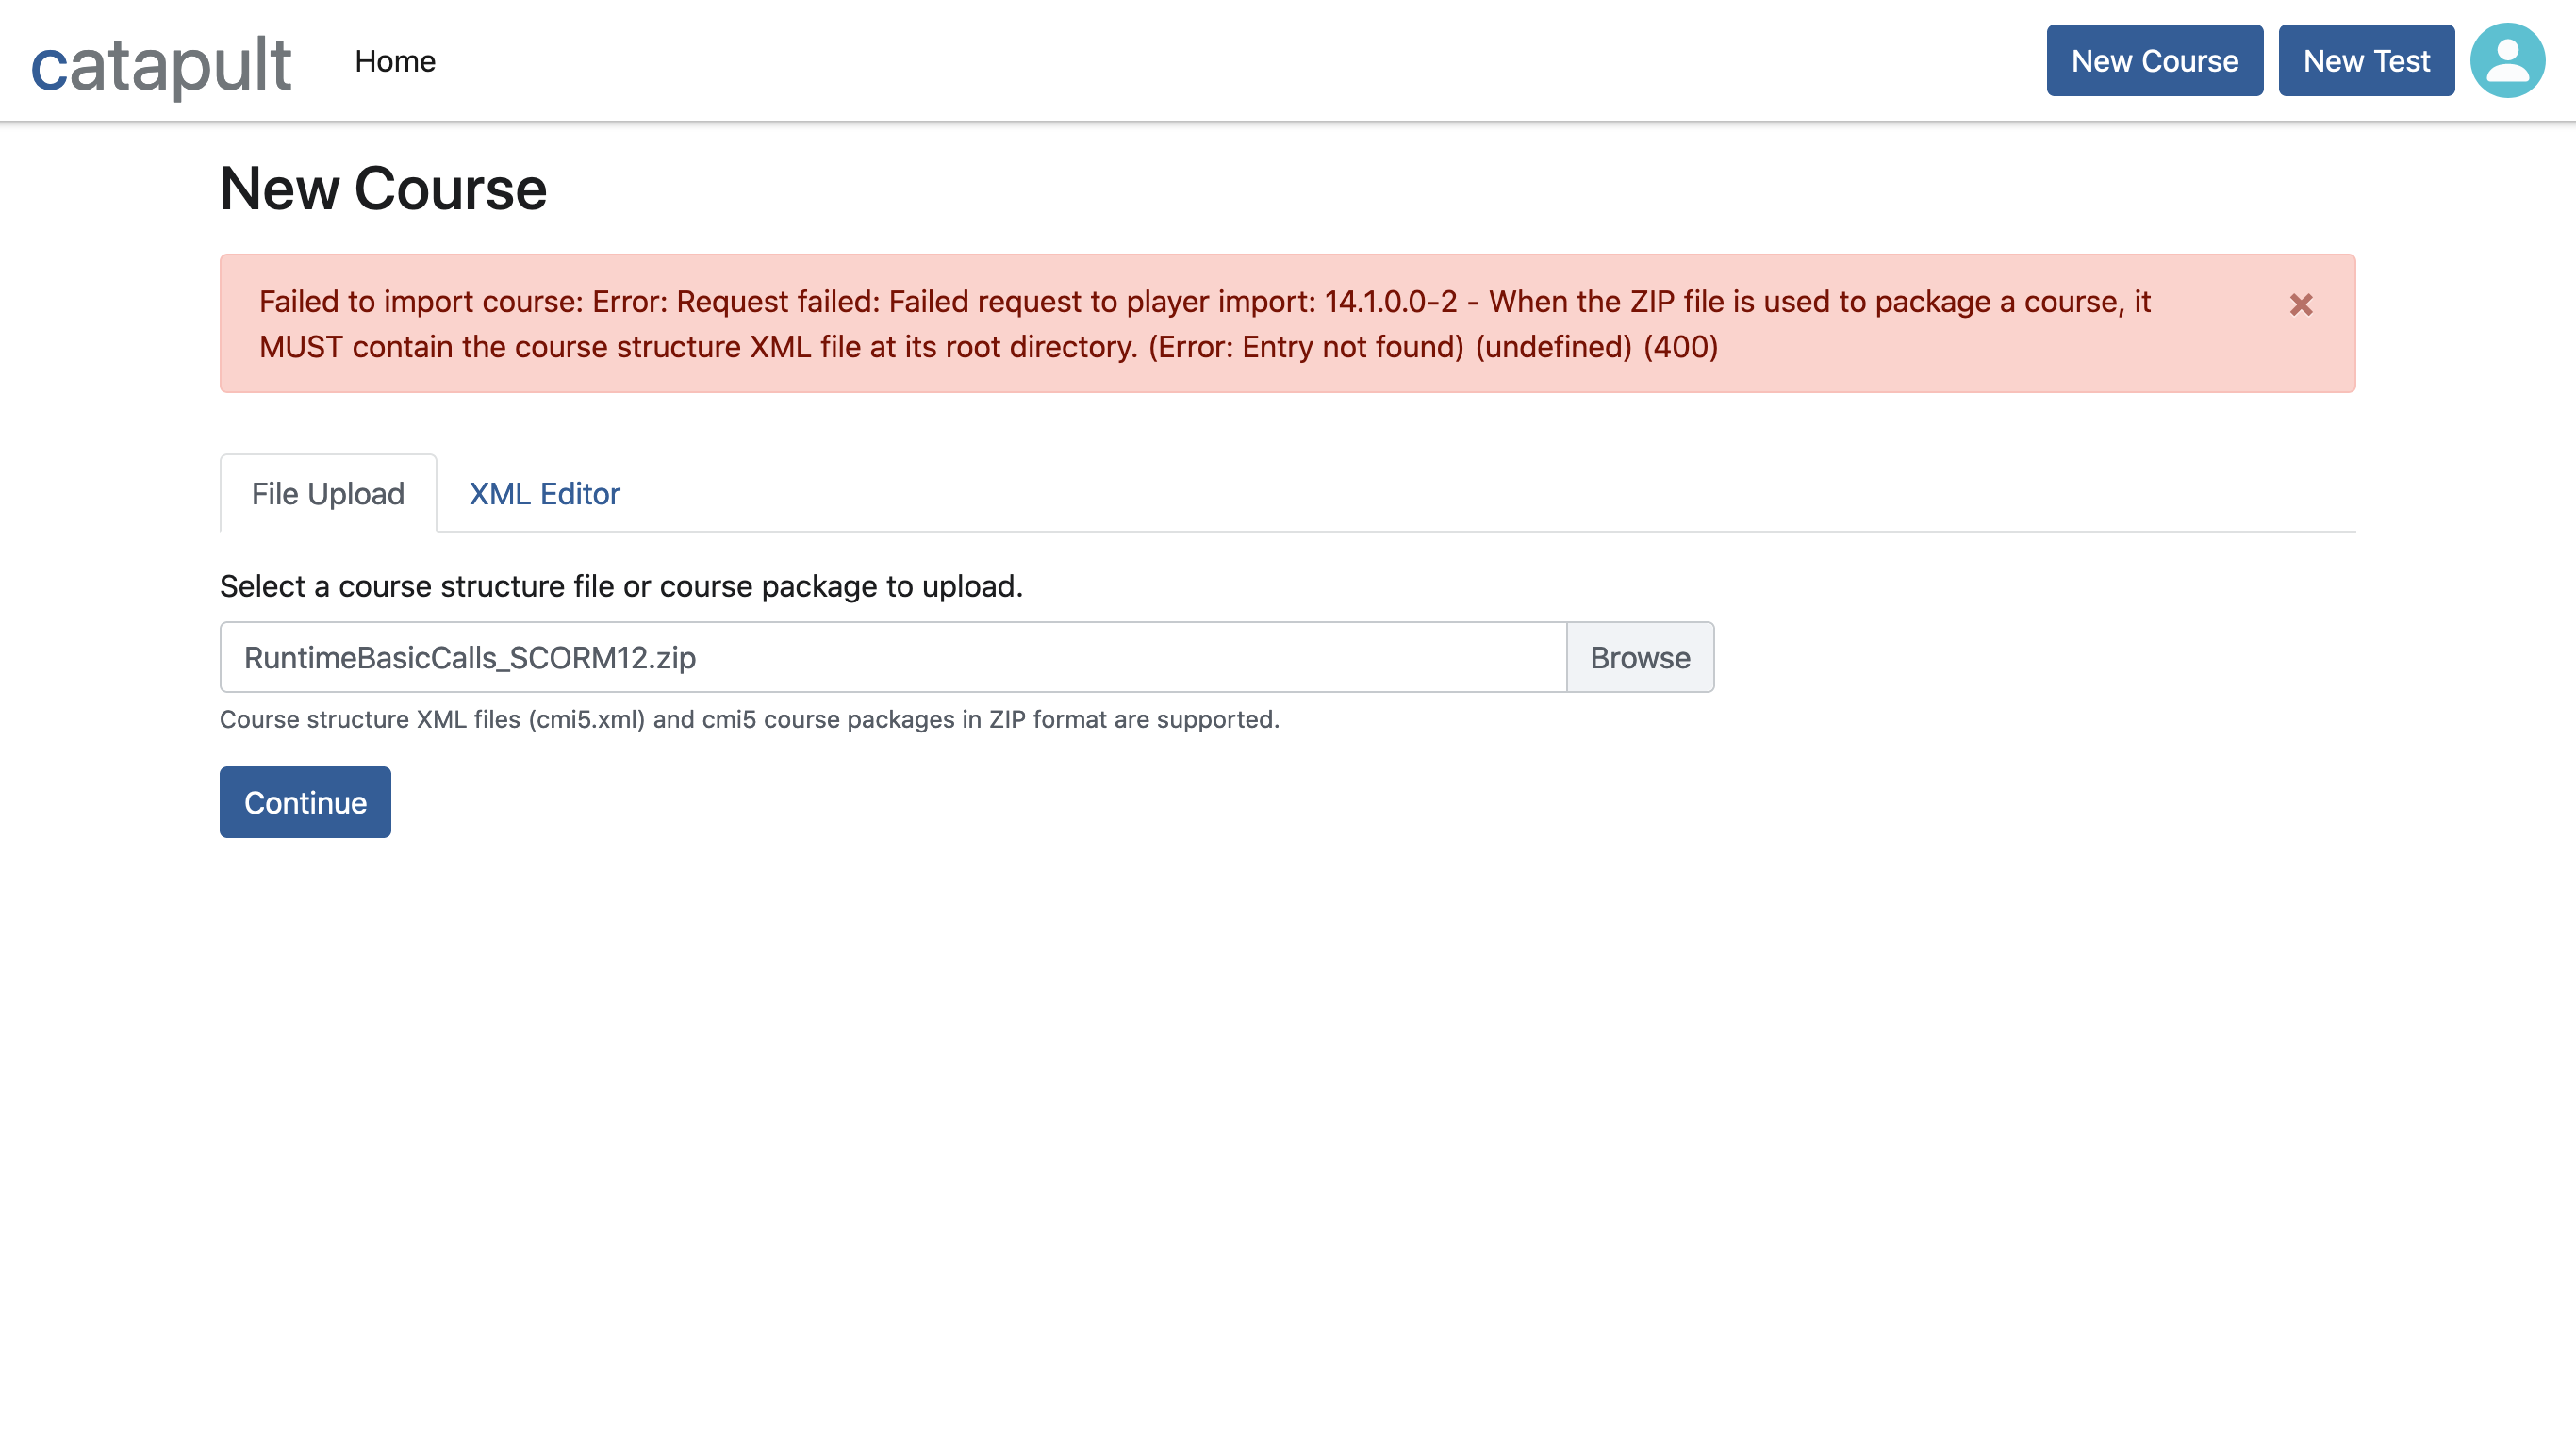
If there are any problems with your course package or cmi5.xml file: the CTS will display an error message with details about the problem.
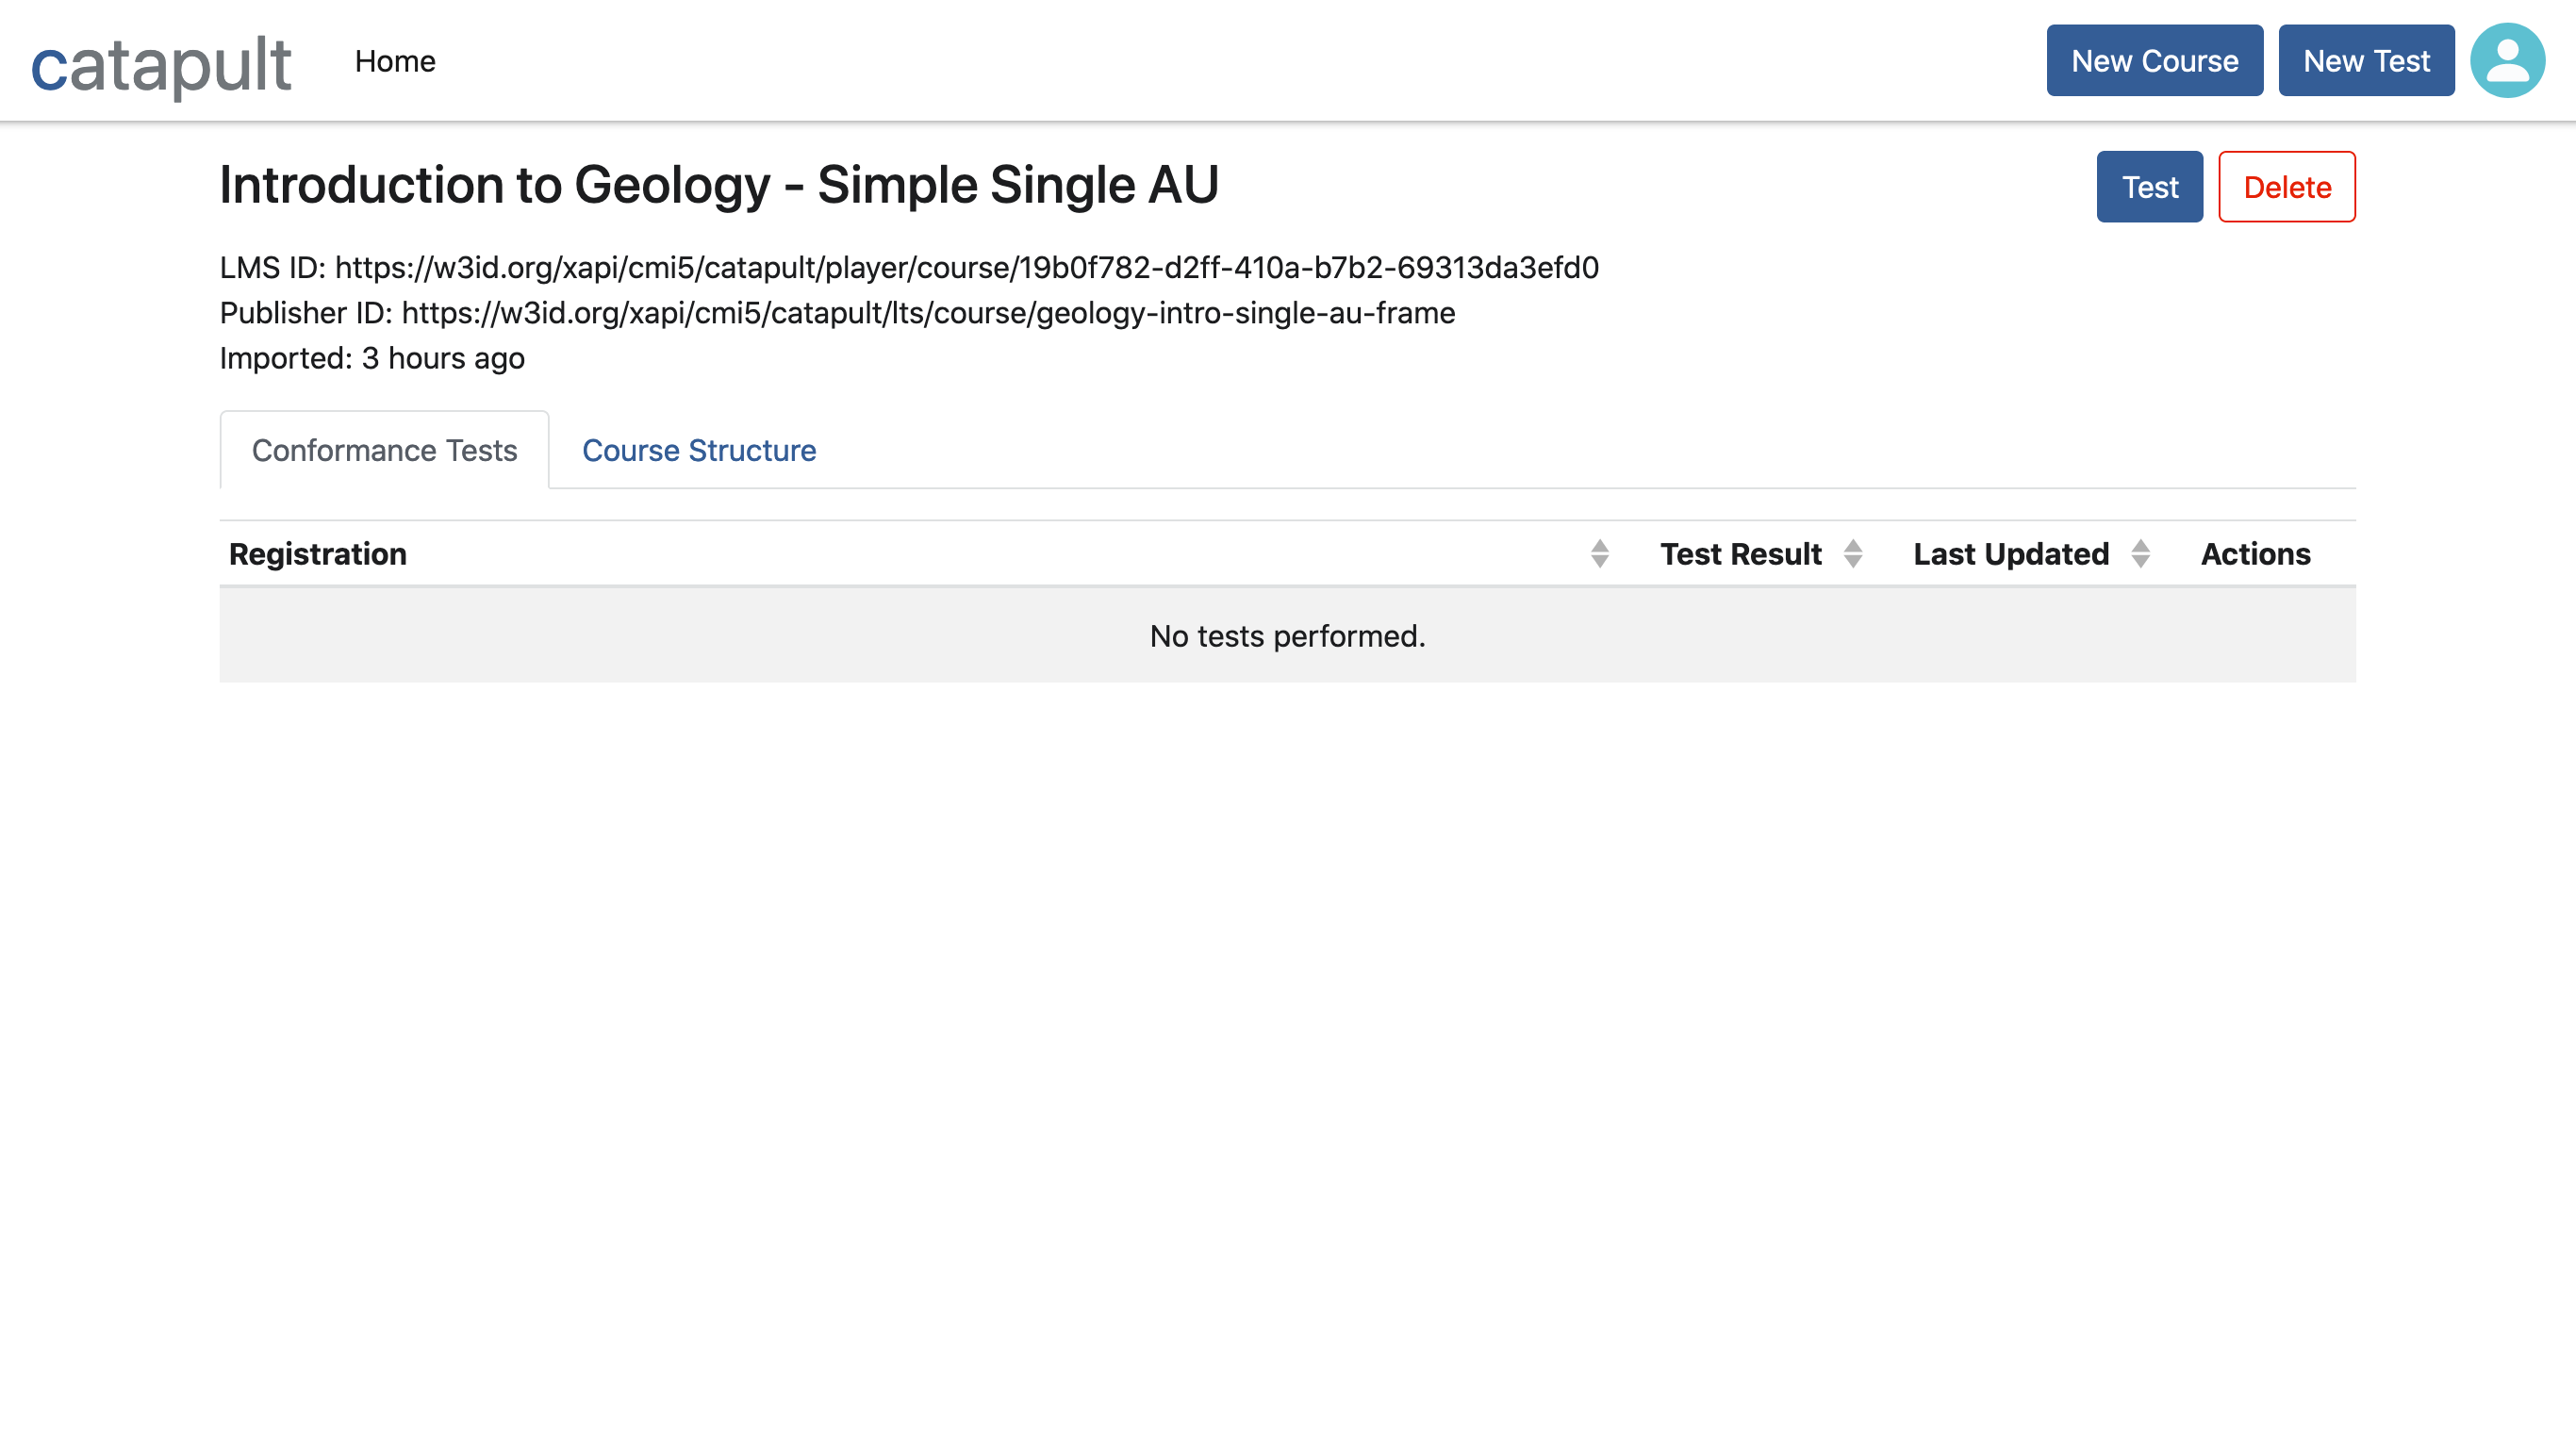
If your course imports successfully: You’ll be taken to the Course Details page for your new course. At the top of the page, underneath the navigation bar, you’ll find the course title and some metadata about the course. To the right, you’ll find “Test” and “Delete” buttons. Below, you’ll find two tabs. On the first tab, called “Conformance Tests”, you’ll find an empty table that will contain the test registrations that you create for this course.
Testing
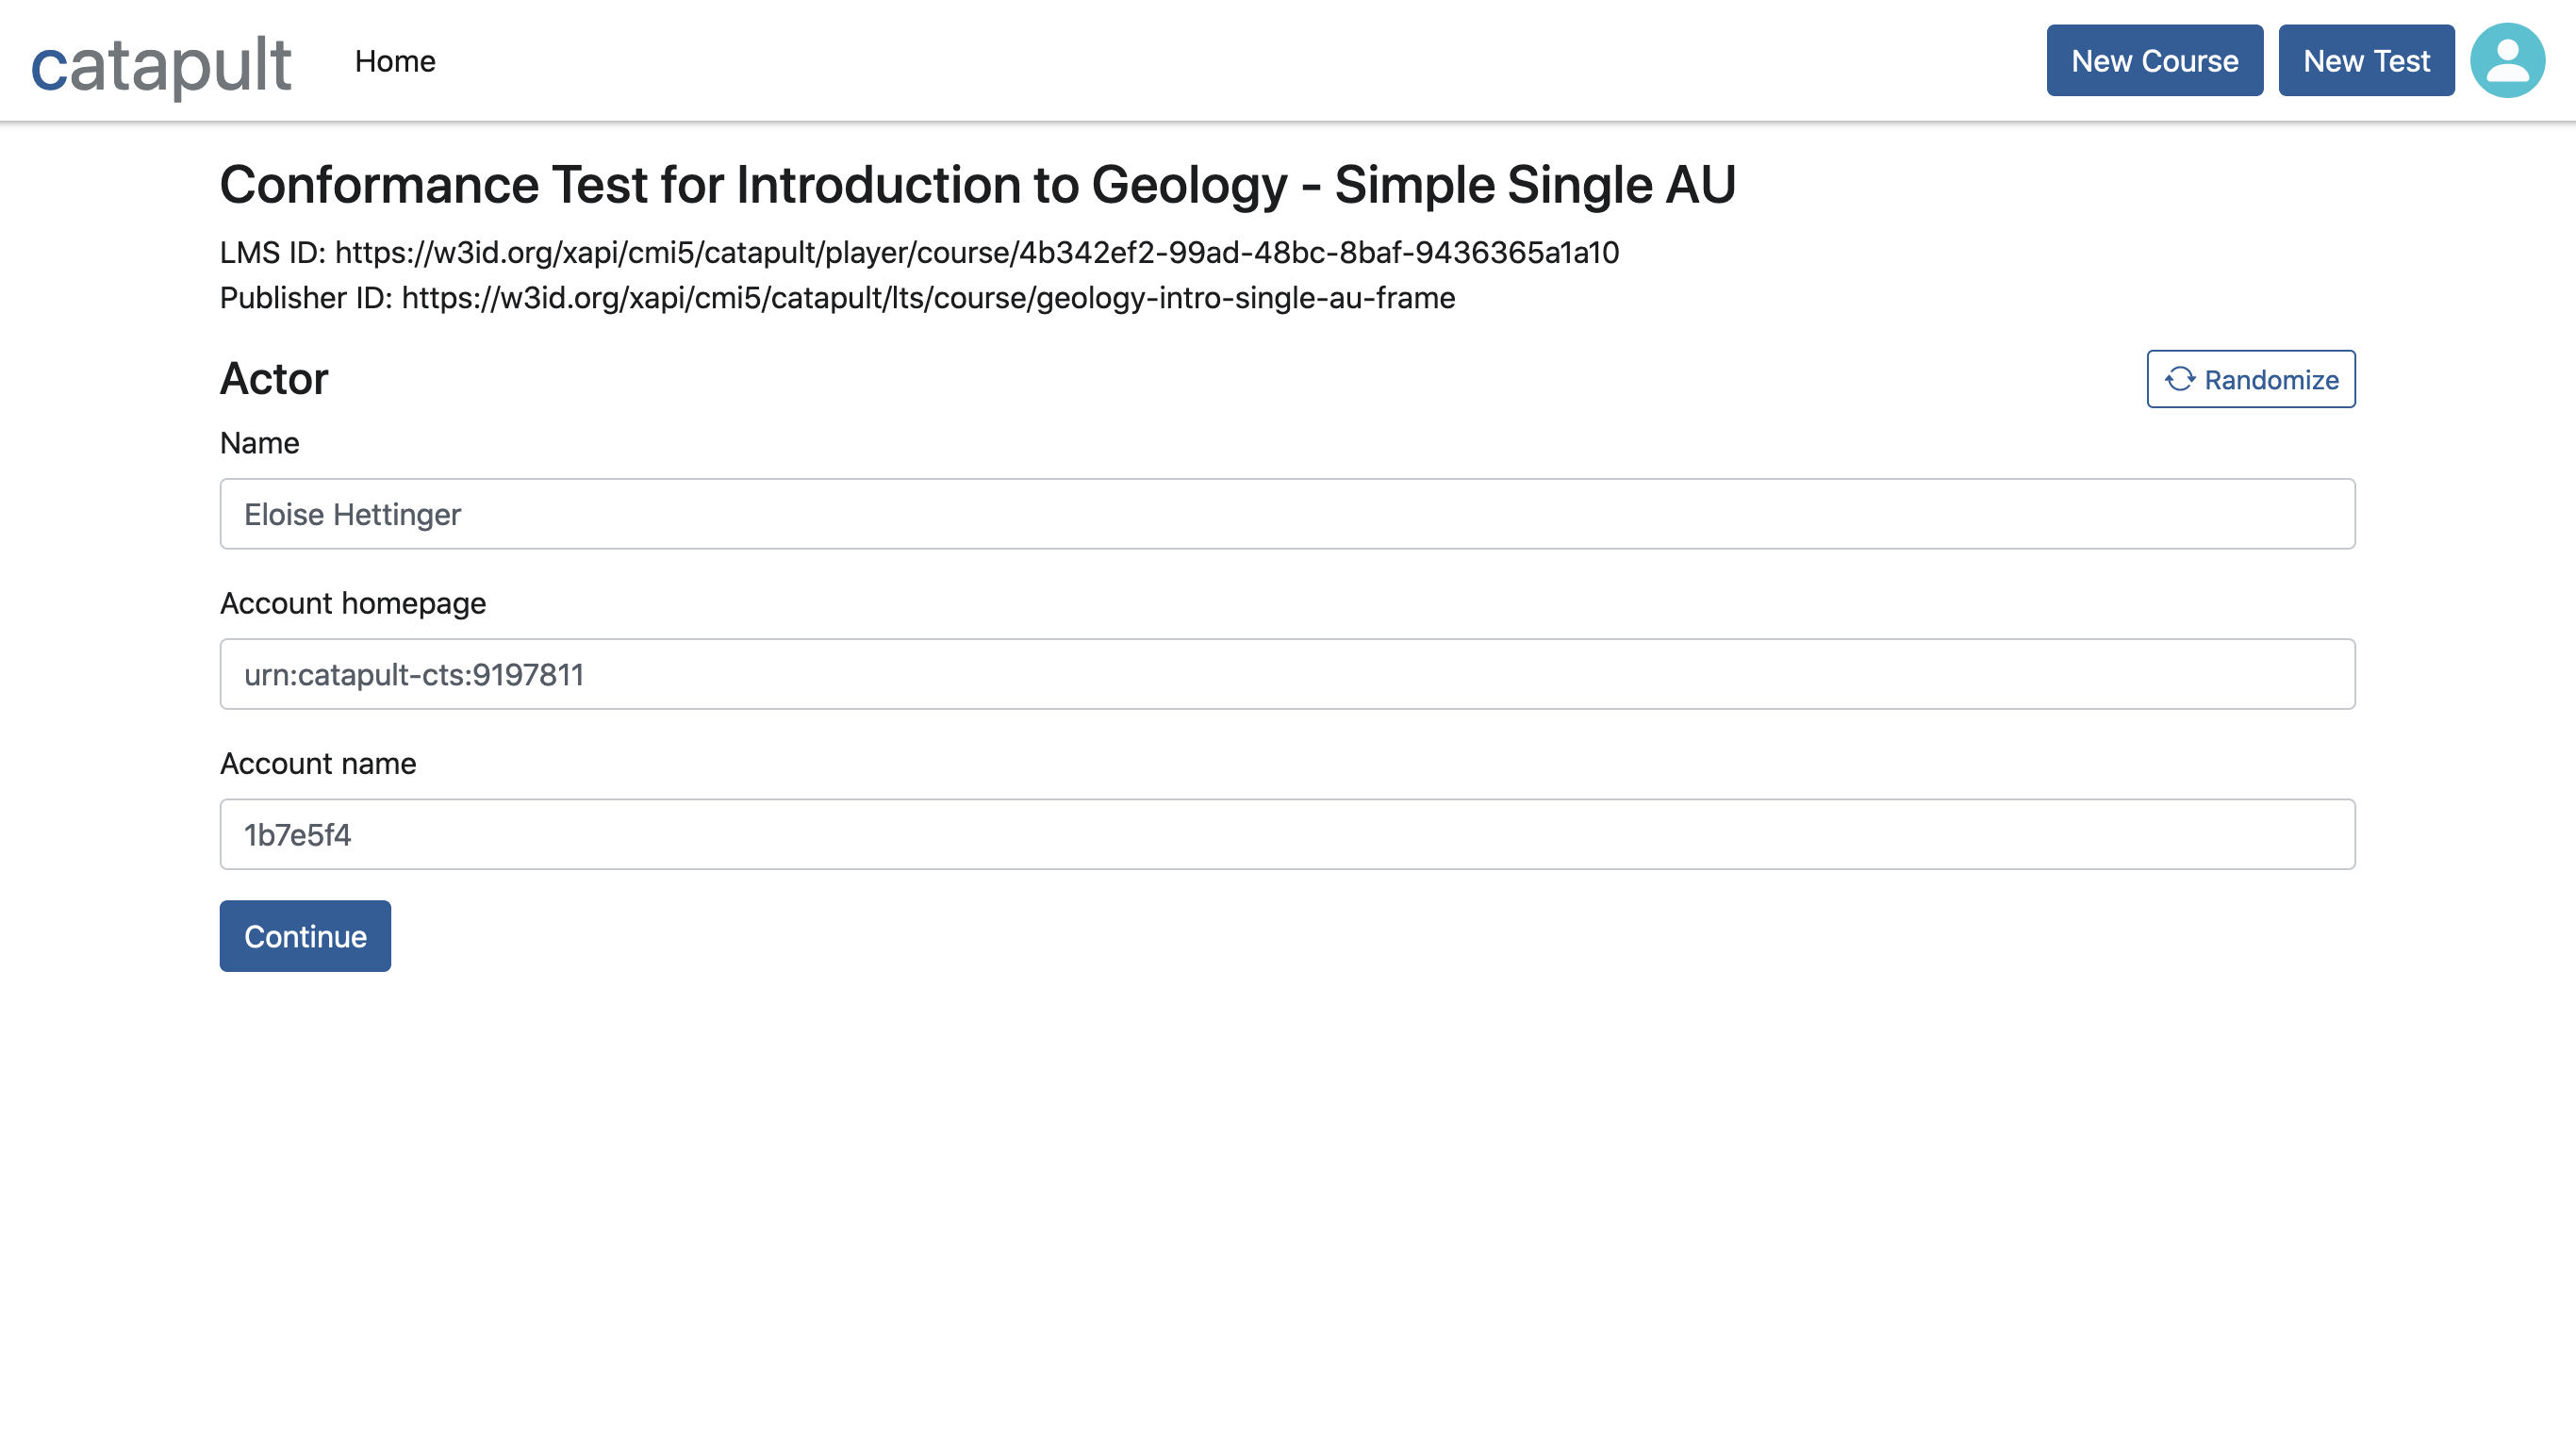
To start a test from the Course Details page: Click the “Test” button in the upper right corner of the screen. You’ll be taken to a page where you can create the xAPI actor object for your test registration. Either provide values for the form fields, or click the “Randomize” button to have the CTS generate values for you. When you’re done, click the “Continue” button to proceed to the Test Details page.
On the Test Details page, you’ll see information about the course and registration, followed by a configuration section where you can adjust the cmi5 Agent Profile values. Underneath that you will find cards for each assignable unit within the course. This is where you will launch or waive each AU, and see their cmi5 conformance status.
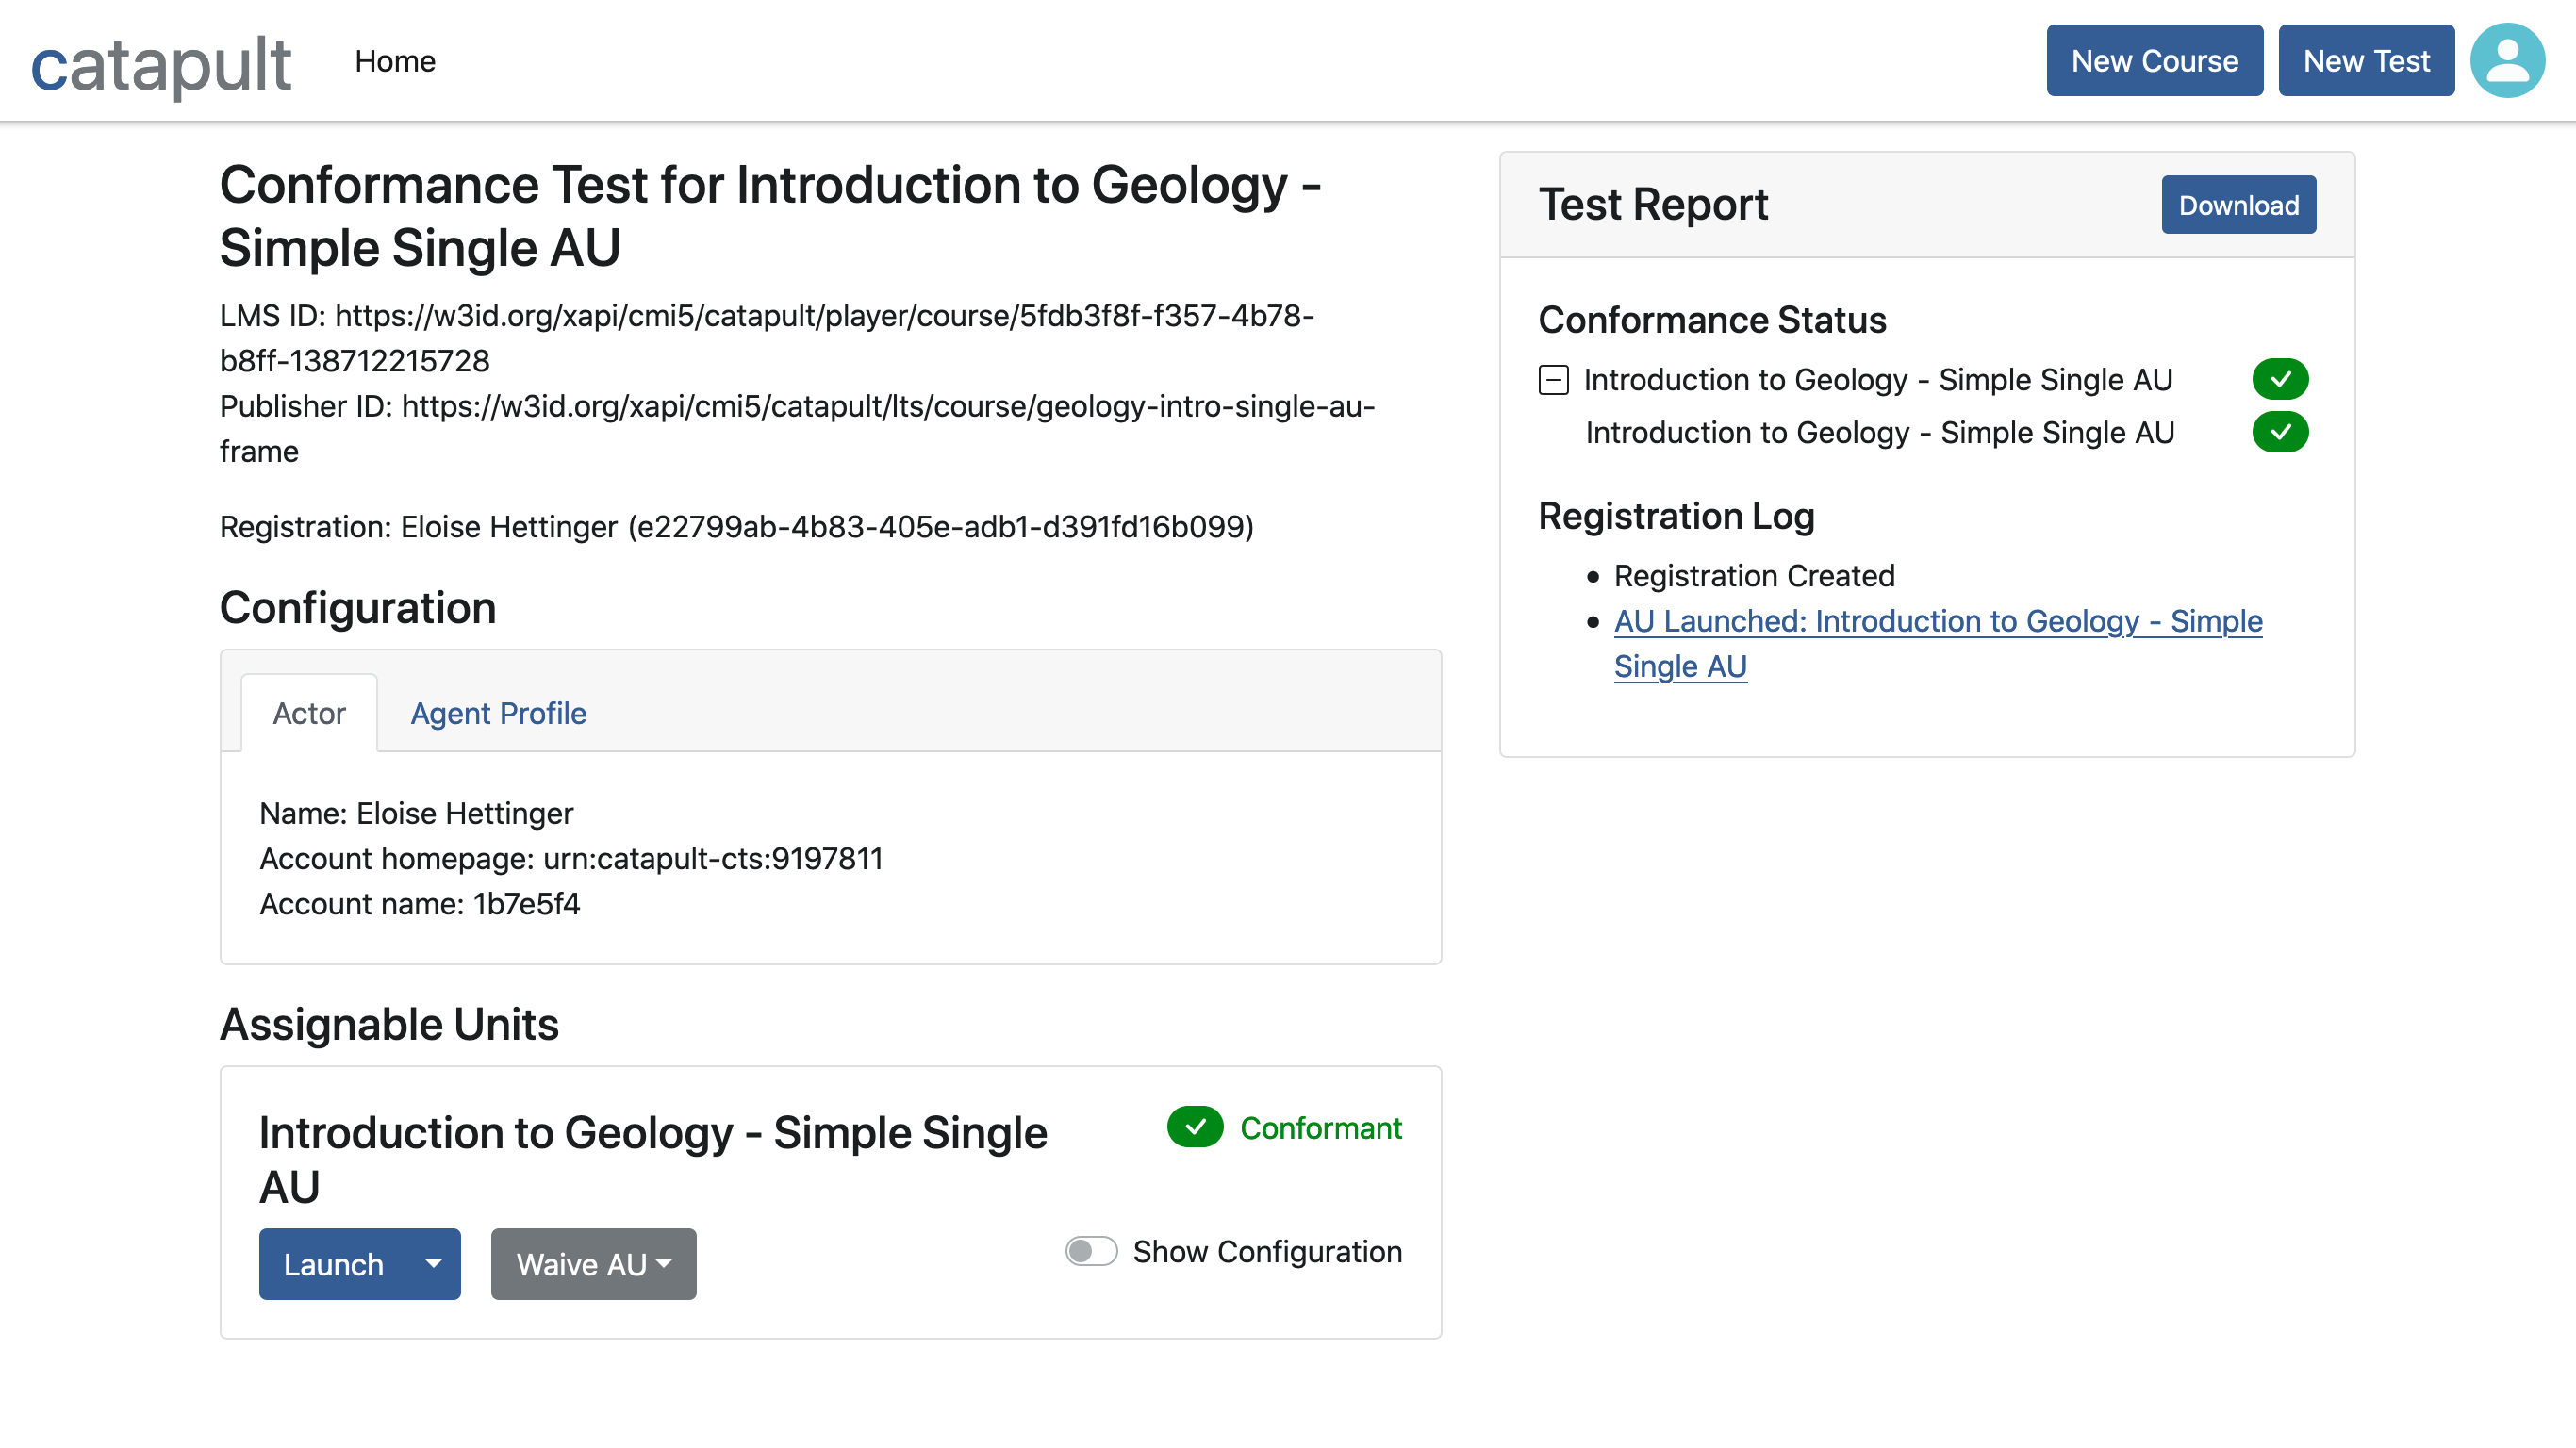
On the right side of the page, you’ll see a Test Report. This will be filled in as you progress through each AU in the course. When you’re finished, you may click the “Download” button to download a file containing a record of your test session.
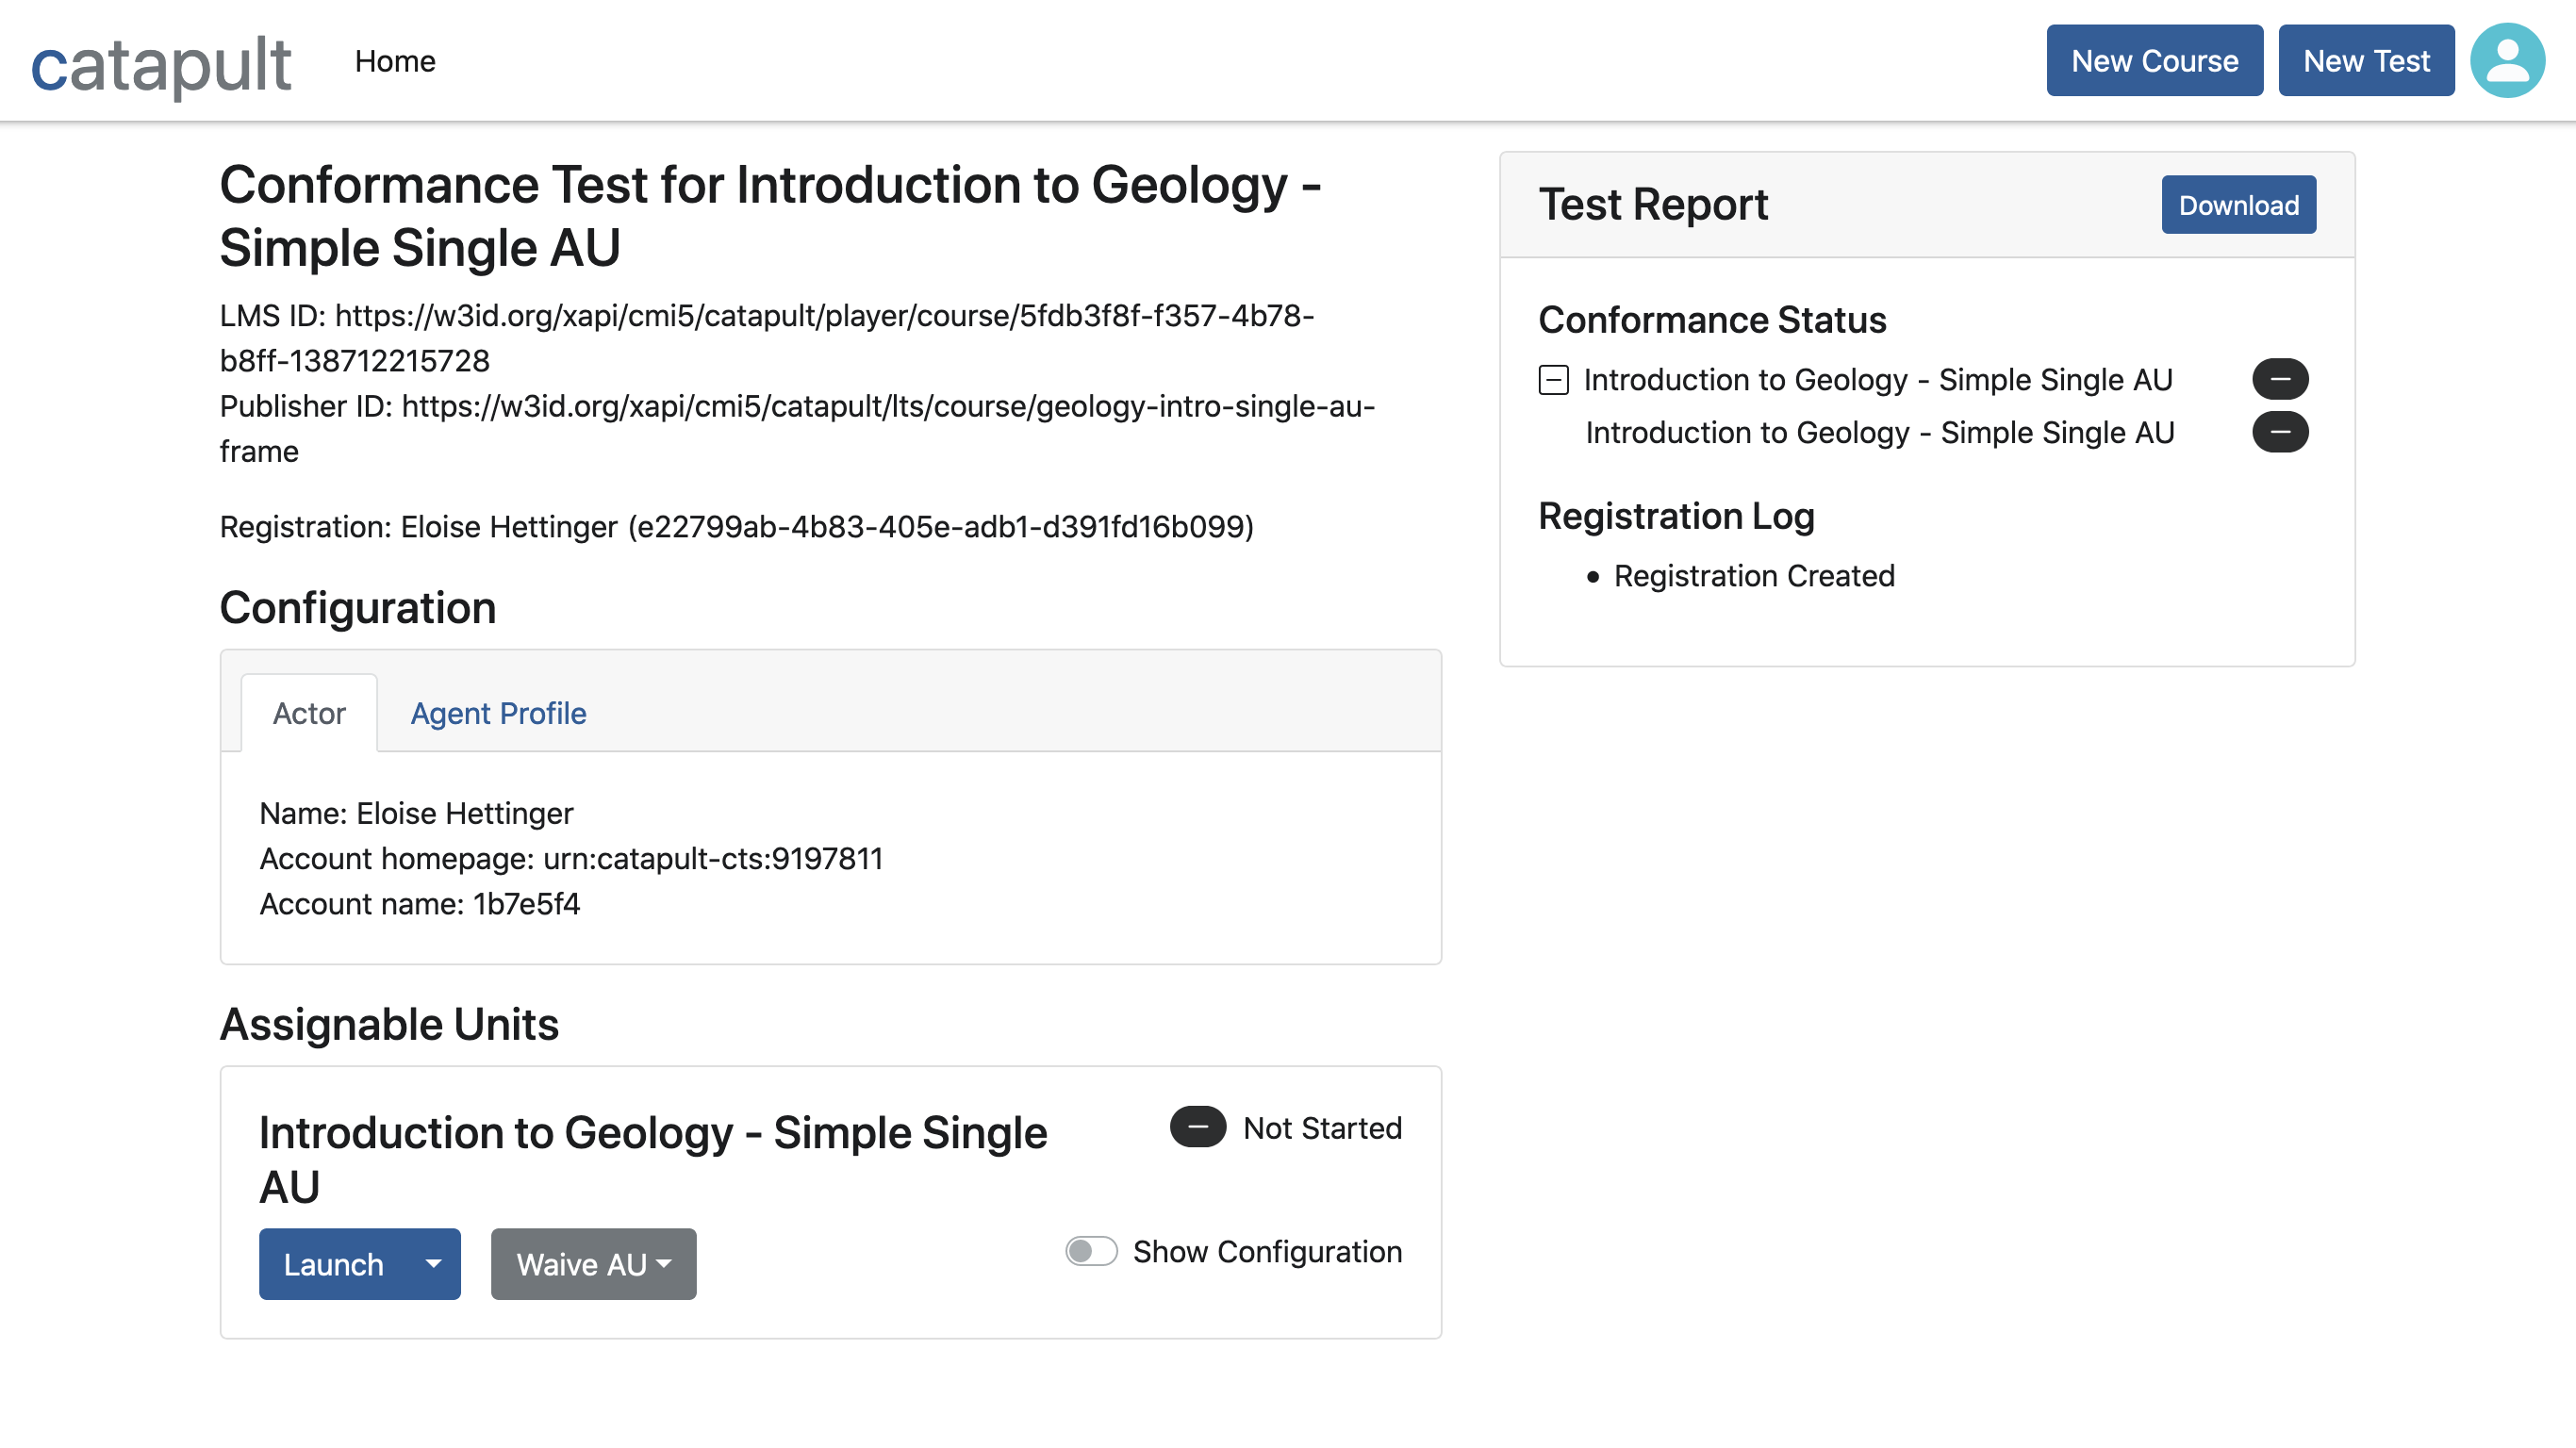
To test an AU: Under most circumstances, you can just click the “Launch” button in the AU’s card. This will start a normal launch with configuration settings from the course structure. If you need to launch the AU in “browse” or “review” mode, or use different configuration settings, that is also possible. See Test Details in the Reference section for more information.
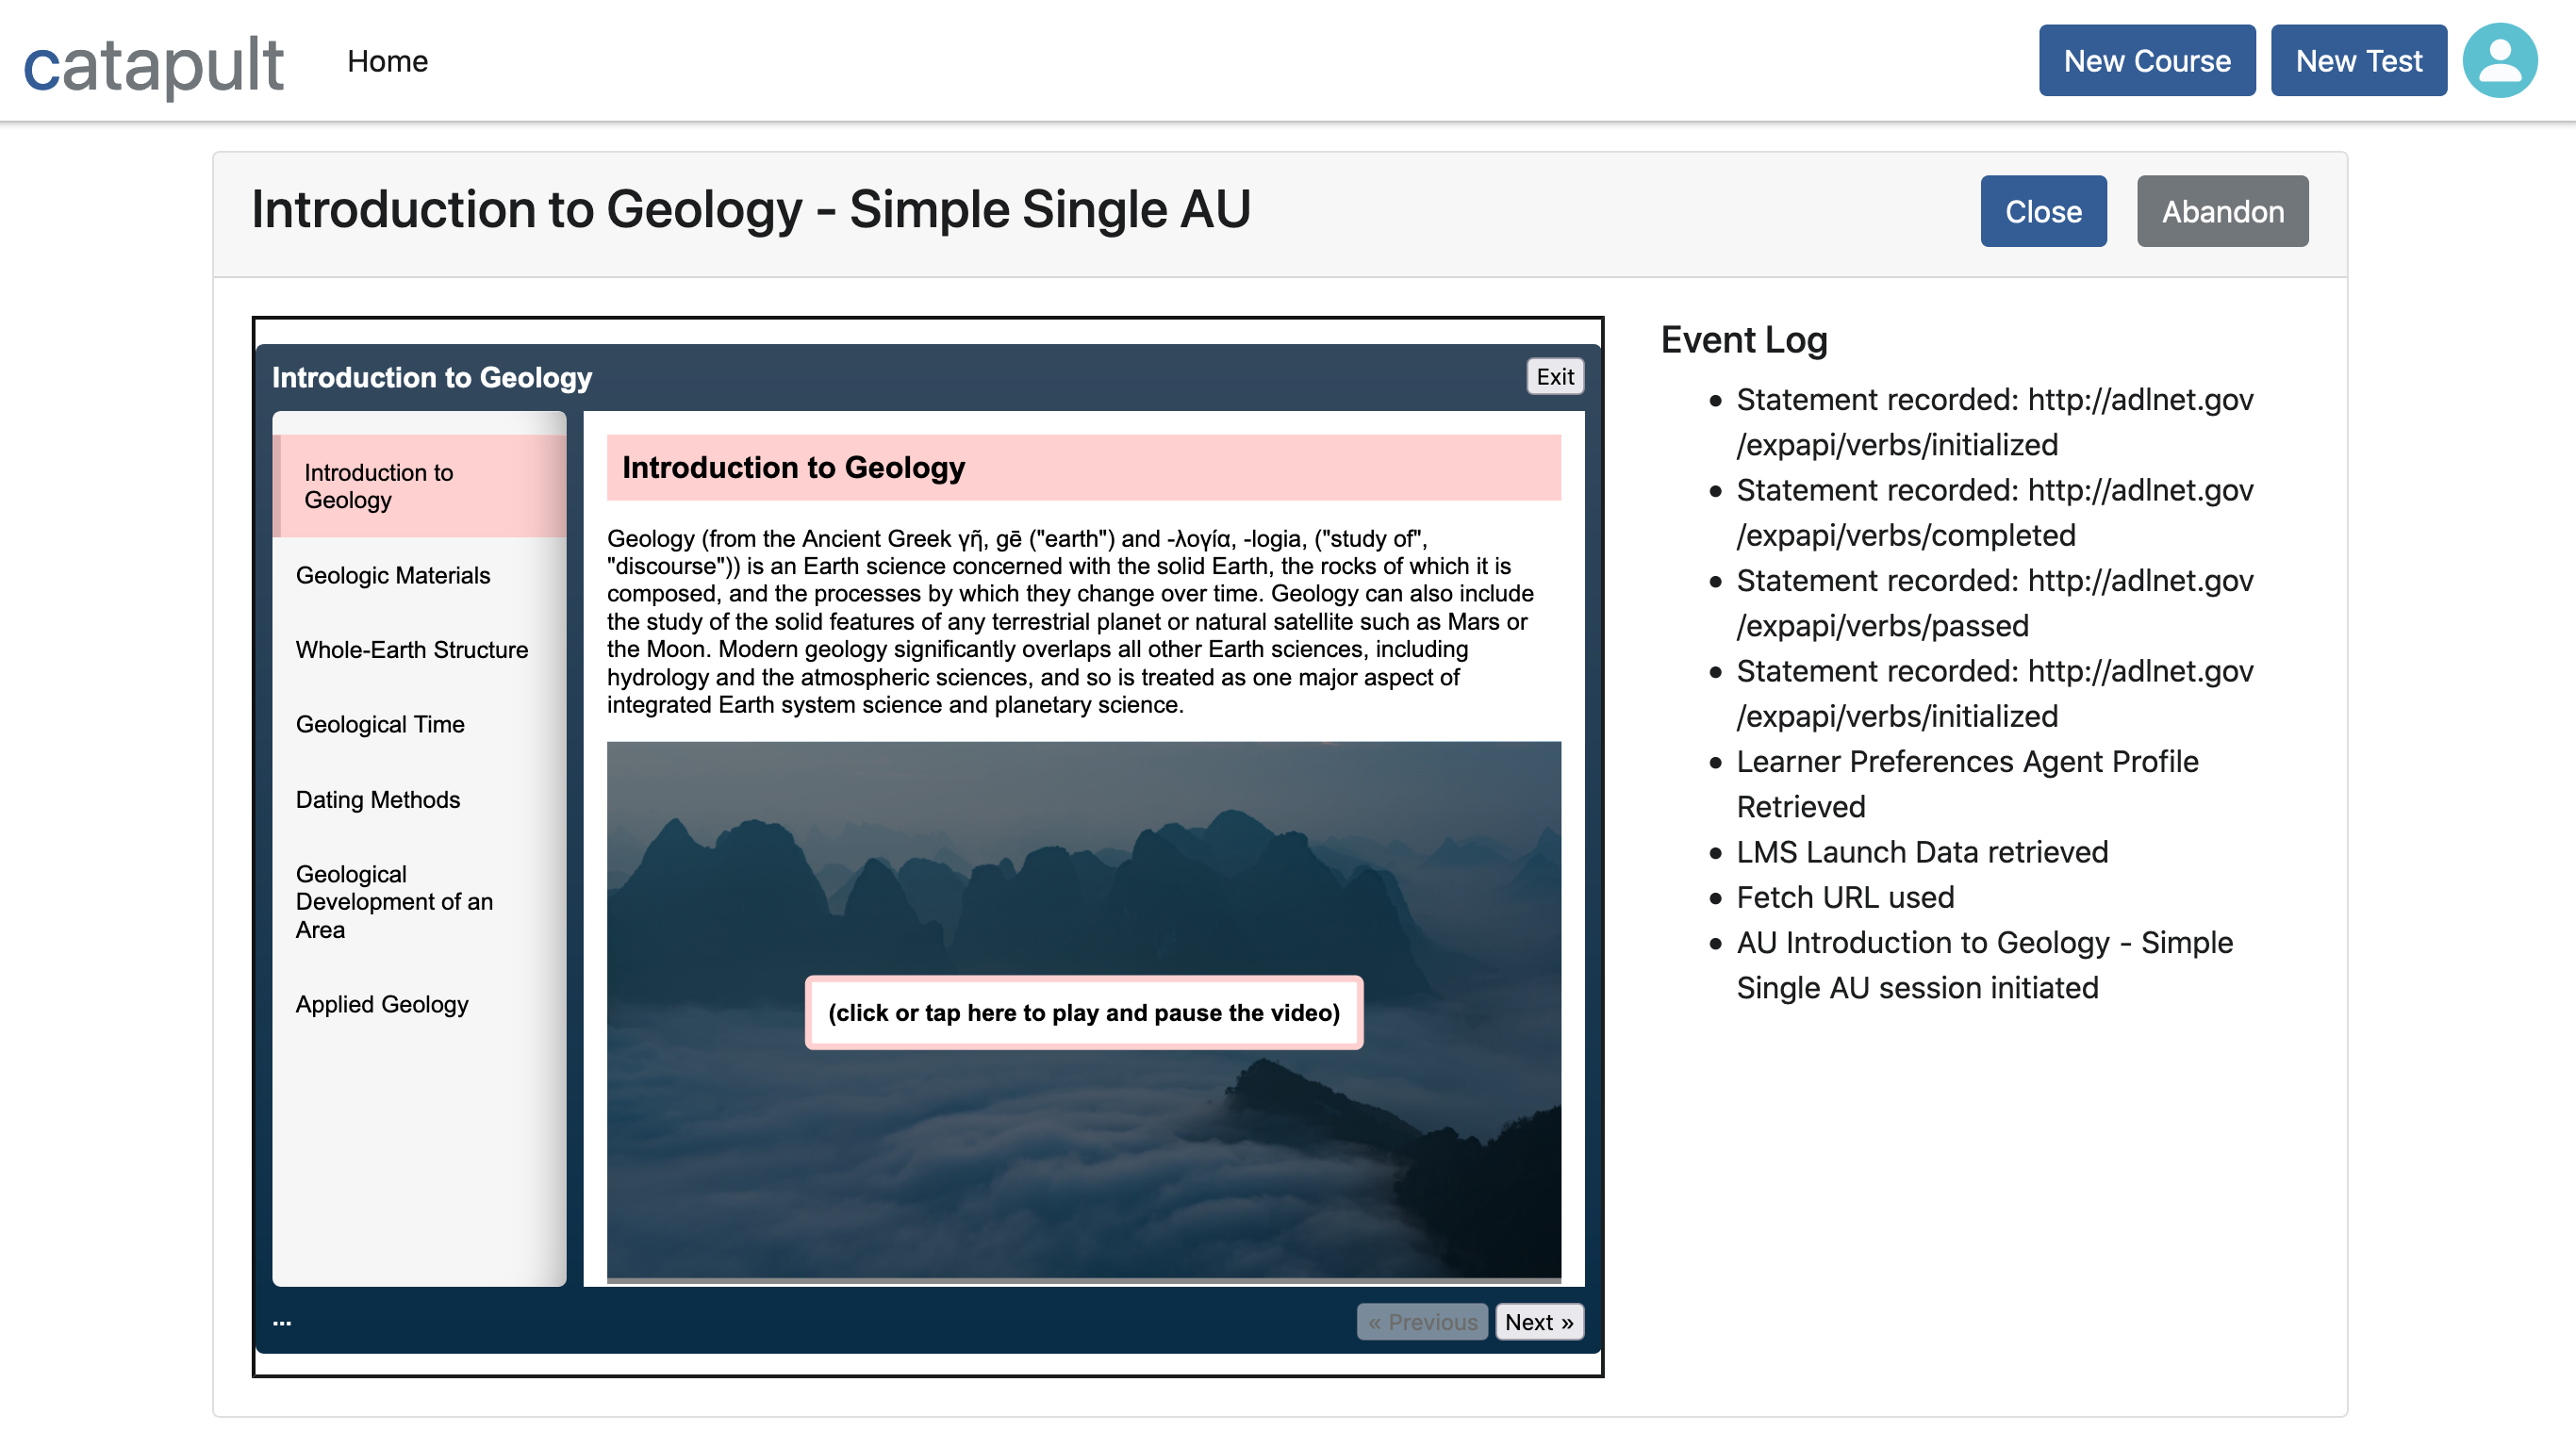
When you launch an AU, you’ll see the content in an iframe or a new window (depending on the course structure and configuration) alongside a running log of statements and other session events that will be updated as you progress through the AU. You’ll also see a “Close” button that will return you to the Test Details page, and an “Abandon” button that will issue an abandoned statement and cause any subsequent statements from the AU to be rejected.
After testing an AU: If the AU performed all the required actions, and didn’t do anything forbidden by the cmi5 specification, then a green checkmark will appear next to the AU’s title in the Test Report, and in its card in the Assignable Units list. Otherwise, a red X will appear instead. In either case, the Test Report’s registration log will have an “AU Launched” entry that you may click on to review the event log for the AU session.
Next steps: If your course consists of multiple AUs, then test each of them in the same manner. After you’ve finished, click the Test Report’s “Download” button to download a record of the conformance test. You may be asked to provide this file as proof of the course’s cmi5 conformance.
Reference
This reference covers every aspect of the CTS user interface, starting with some common UI elements that are used throughout the application, followed by descriptions of each of the application’s sections.
Common User Interface Elements
Navigation Bar
The navigation bar provides quick access to the CTS’s home page, as well as the ability to add a new course or start a new test from anywhere in the application. Its components are (from left to right):
- Catapult Logo: A bit of branding to visually identify the CTS as part of the Catapult project.
- Home: Clicking this link will take you to the Course List, where you can see a list of all imported courses and their cmi5 conformance status.
- New Course: Clicking this button will take you to the New Course page, where you can upload a course package, or paste and edit cmi5 course structure XML.
- New Test: Clicking this button will open a course selector drop-down, which you can use to start a new test from anywhere in the application. You can also start new tests from the Course List and Course Details pages.
- User Button: Clicking this round, light blue button will open a drop-down menu with options to view a list of cmi5 specification requirements, or to sign out of the CTS.
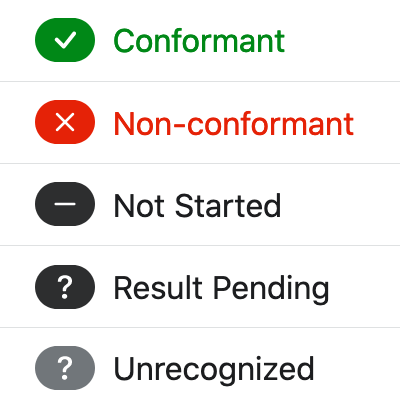
Test Result Indicators
The CTS uses a combination of symbol, color, and (when space allows) text to indicate the result of conformance testing for assignable units (AUs), blocks, and courses. These test result indicators are used by the Course List and Test Details pages, among others. The different types of indicator are as follows:
- Conformant: This test result indicator is a white checkmark on a green background. For AUs, it means that every requirement of the cmi5 specification has been met, and the AU has been satisfied according to its “moveOn” criteria. For blocks and courses, it means that all of the child AUs and blocks have been tested and are conformant.
- Non-conformant: This test result indicator is a white “X” on a red background. For AUs, it means that some requirement of the cmi5 specification was not met. For blocks and courses, it means that a child AU has been tested and was not conformant.
- Not Started: This test result indicator is a white “-“ on a black background. For AUs, it means that the AU has not yet been tested. For blocks and courses, it means that no child AUs have been tested.
- Result Pending: This test result indicator is a white “?” on a black background. For AUs, it means that the AU has been launched and (so far) hasn’t violated any of the cmi5 specification requirements, but also hasn’t been satisfied according to its “moveOn” criteria. For blocks and courses, it means that at least one child AU has been launched, but more testing is required.
- Unrecognized: This test result indicator is a white “?” on a grey background. It means that there was a problem with loading the test status. If you see this on the Course List page, try using the “Reload” button. Otherwise, try refreshing the browser window.
Course Details
Accessed by: clicking a course’s title in the Course List, or creating a new course.
At the top of the Course Details page, you’ll see a heading with the course’s title, followed by its LMS ID (generated by the CTS) and Publisher ID (from the course structure), and how long ago the course was imported into the CTS.
To the right of the title and metadata are two buttons:
- Test: Clicking this button will begin a new test for the course.
- Delete: Clicking this button will open a confirmation message with a warning that deleting a course will also delete all associated test data, and options to continue or cancel.
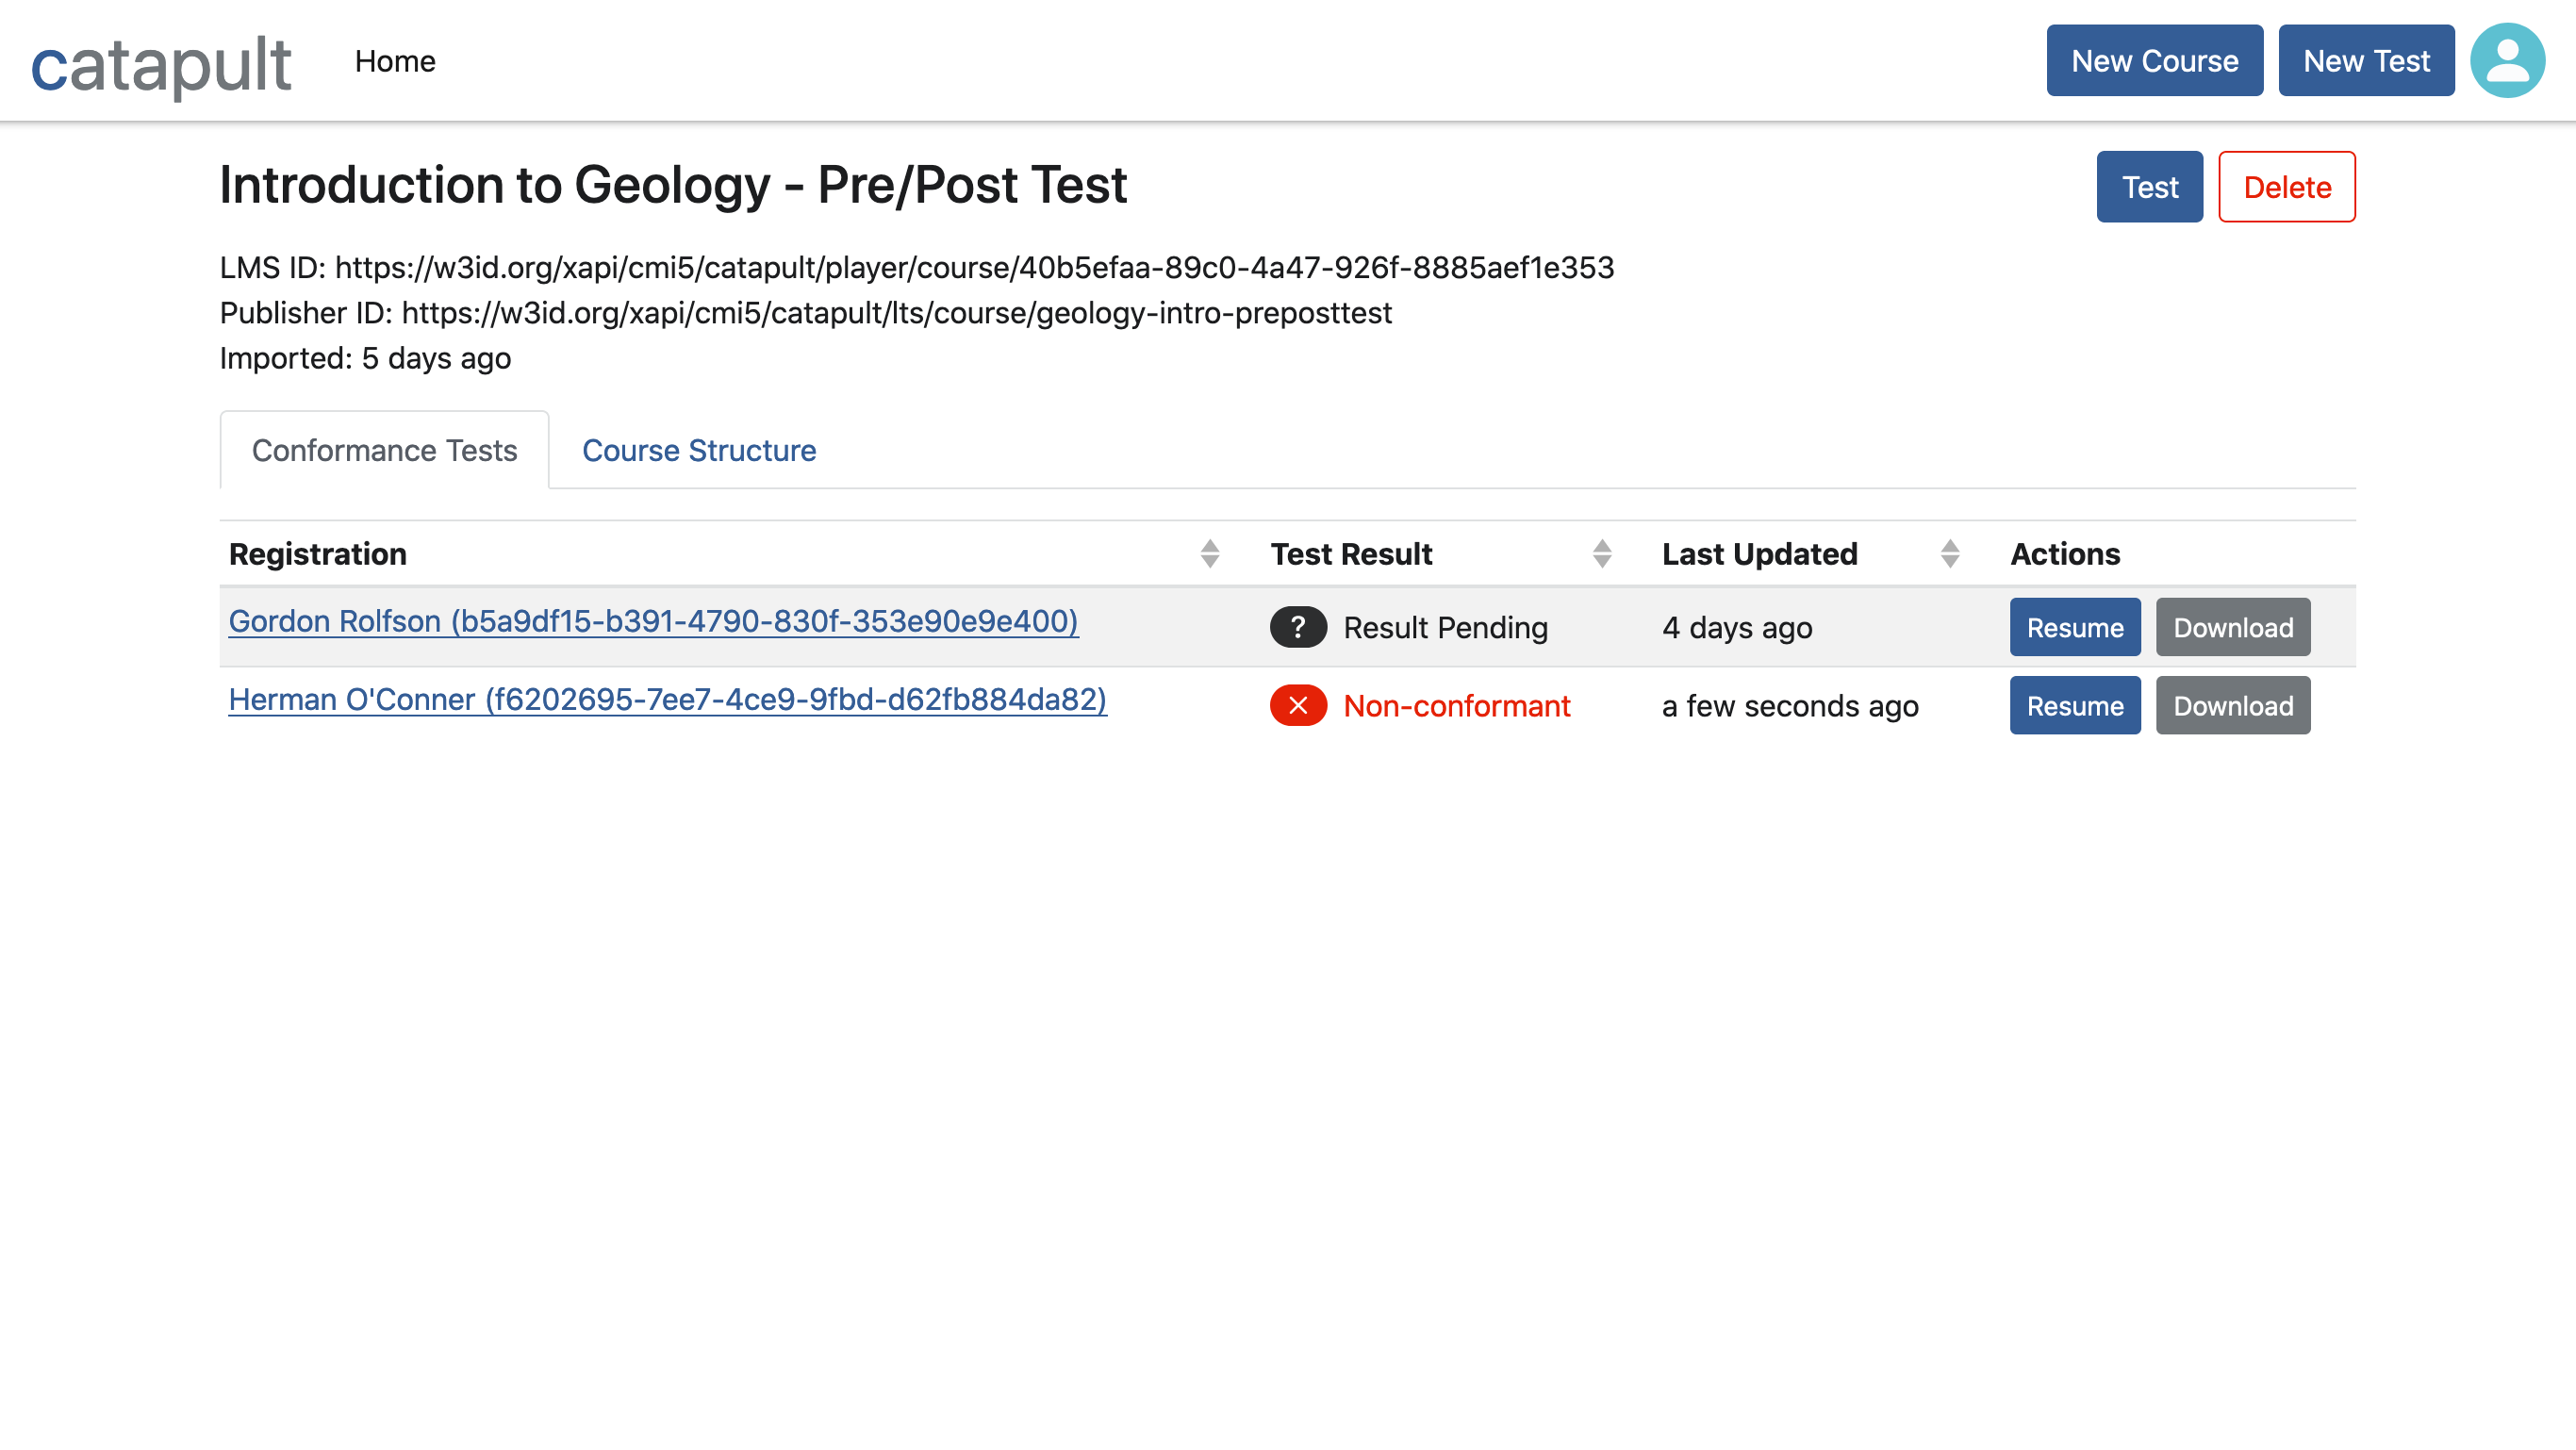
Below all of that, you’ll find two tabs. The first one is called “Conformance Tests”, and it contains a list of the tests that have been created for the course. The list has the following columns:
- Registration: The name of the actor for this test’s registration, followed by the registration ID. This value is also a link to the Test Details page.
- Test Result: The current result of the conformance test.
- Last Updated: How long ago the test was updated (e.g., an AU was launched).
Clicking any of those three column headers will sort the list. Clicking a second time will reverse the sort order.
The list also has an “Actions” column with two buttons:
- Resume: Clicking this button will take you to the Test Details page.
- Download: Clicking this button will download the test’s JSON report file.
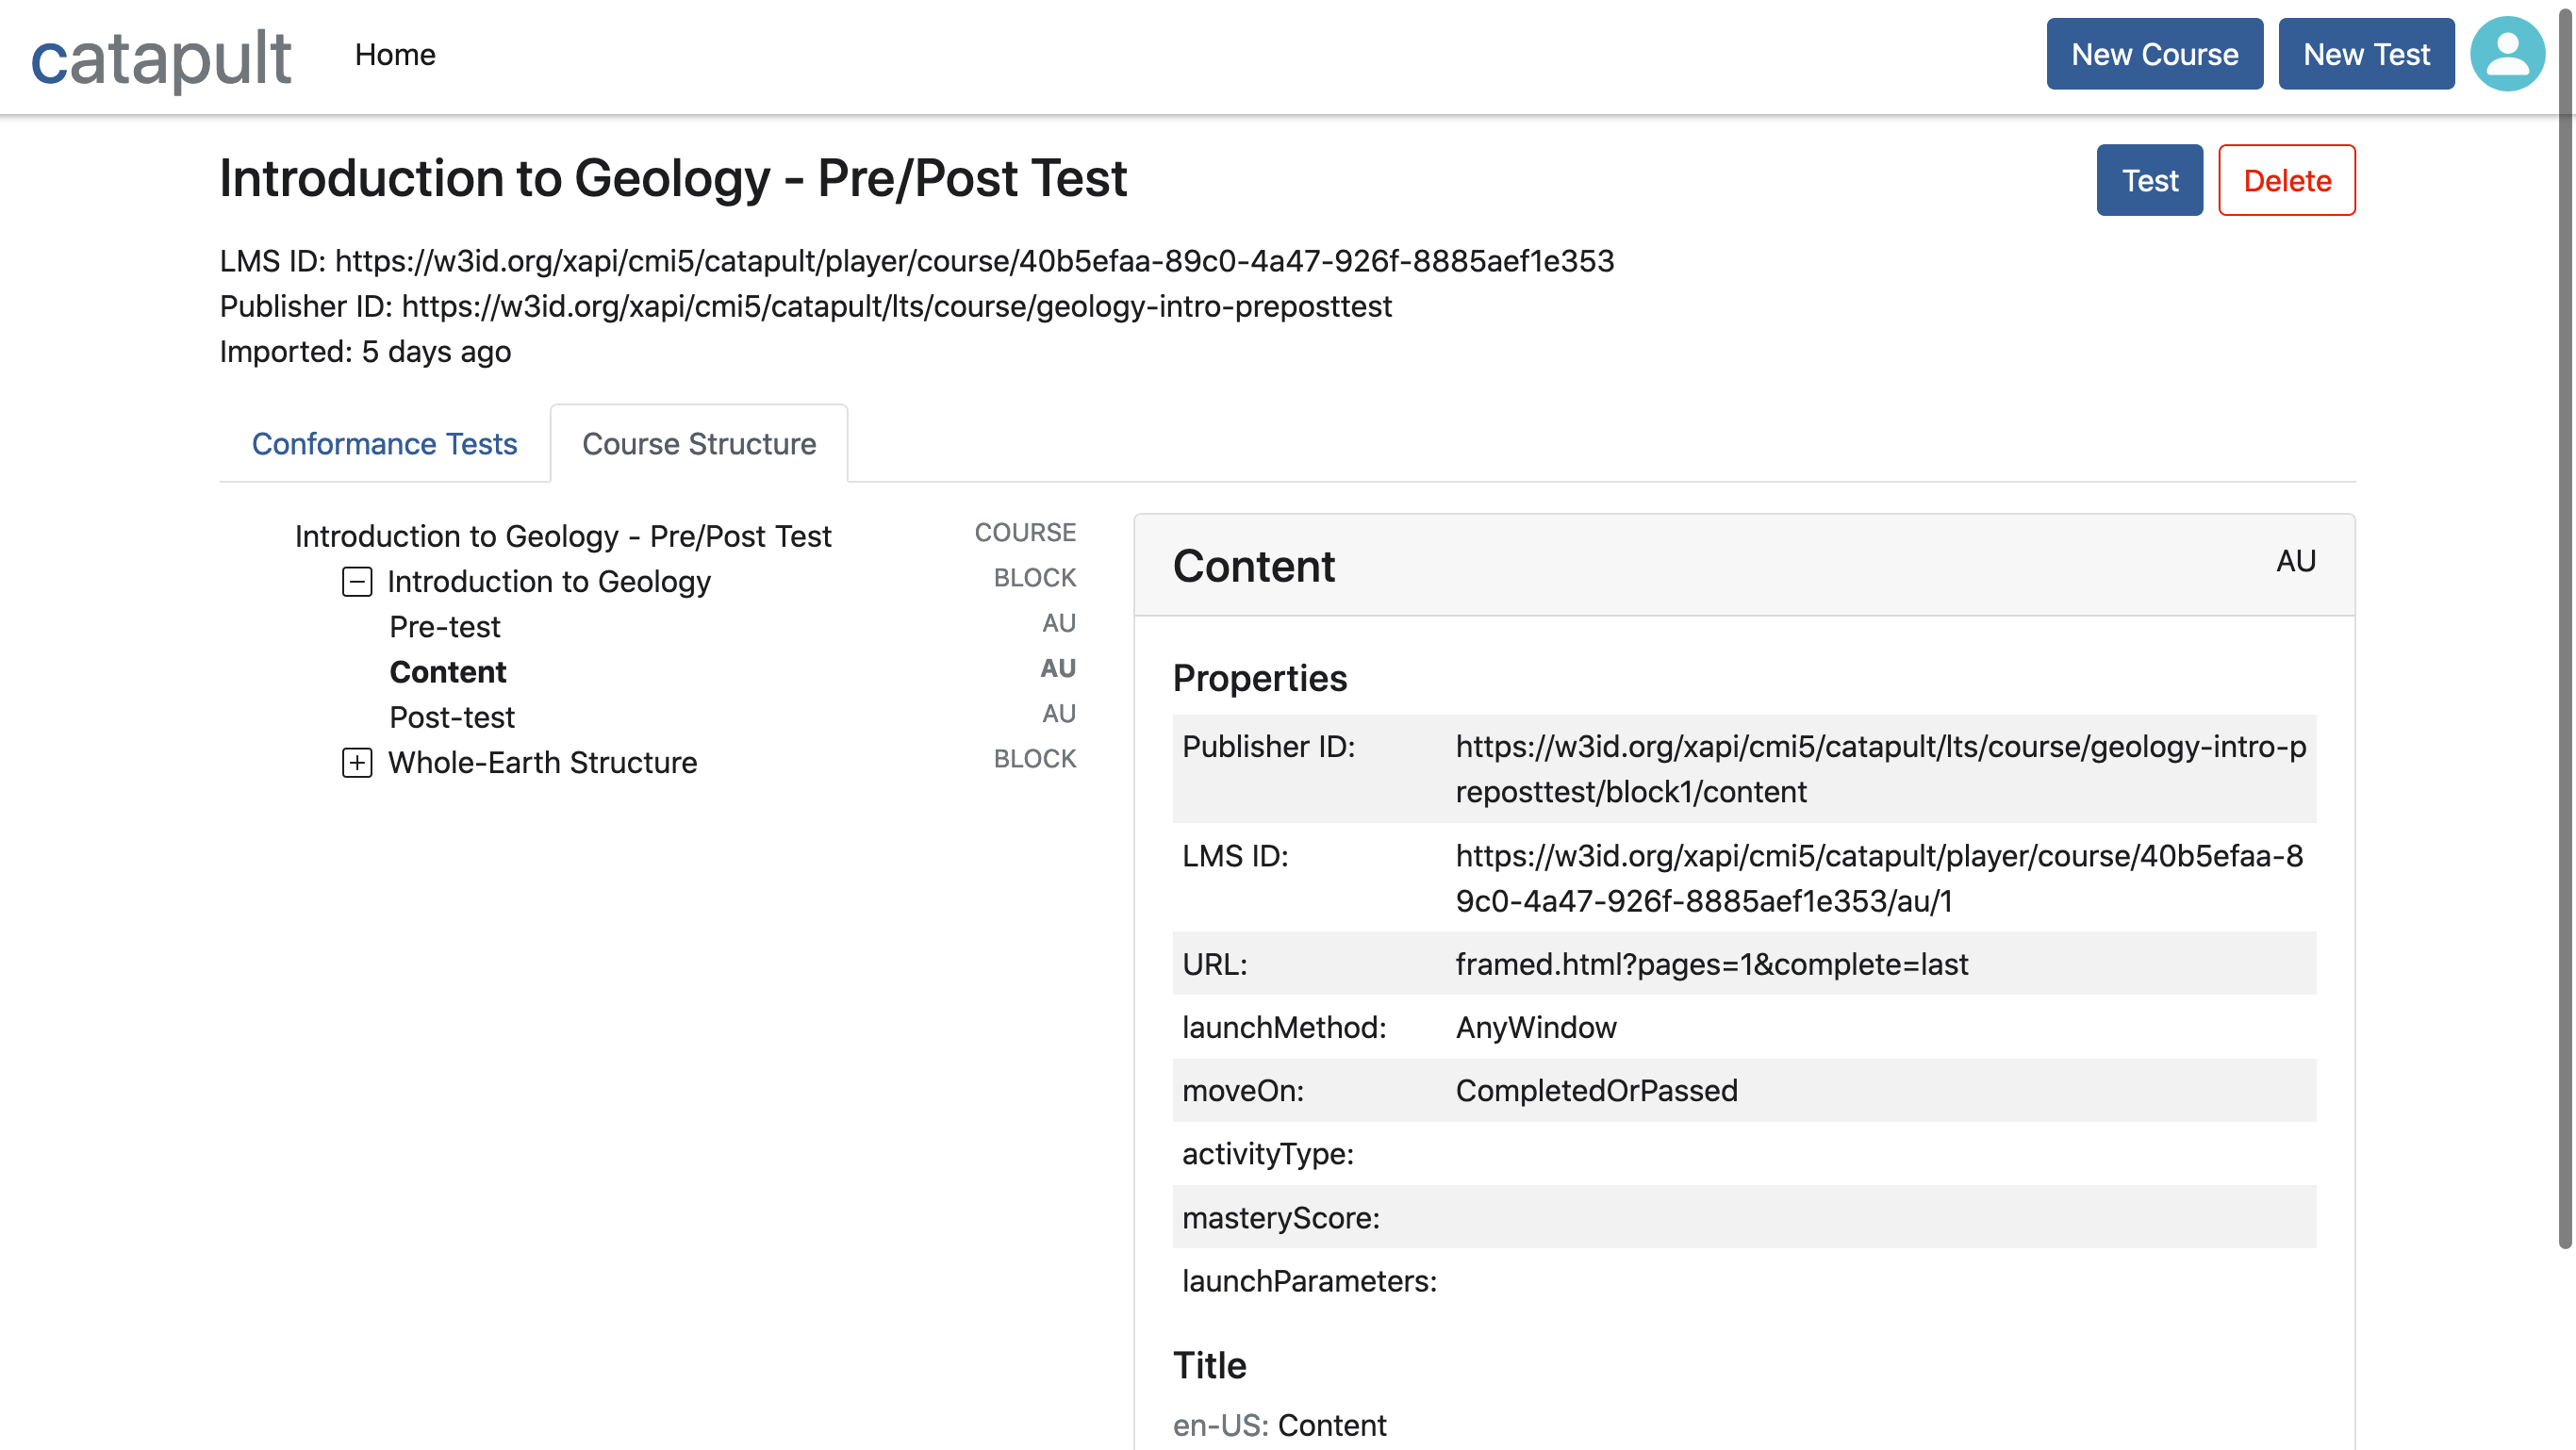
The second tab is called “Course Structure”, and it provides a view of the information from the course structure file. In the left column, there is a tree view with the course itself at the top, and all of the AUs and blocks that make up the course underneath. Clicking any of those components will show metadata in the panel to the right. For a description of each of the fields in the metadata panel, see the cmi5 specification, Section 13.1: Course Structure Data Model.
Course List
Accessed by: clicking the “Home” link on the navigation bar.
The Course List is the CTS’s home page, and it shows you every course that you have imported. It gives summary information about each course, as well as links to Course Details and Test Details. The list has the following columns:
- Title: The course’s title, which is also a link to its Course Details page.
- Test Result: The result of the course’s most recent conformance test (or “Not Started”).
- Imported: How long ago the course was imported.
- Last Tested: How long ago the course was last tested (or “Never”). If the course has been tested, then this will be a link to the Test Details page.
Clicking any of those four column headers will sort the list. Clicking a second time will reverse the sort order.
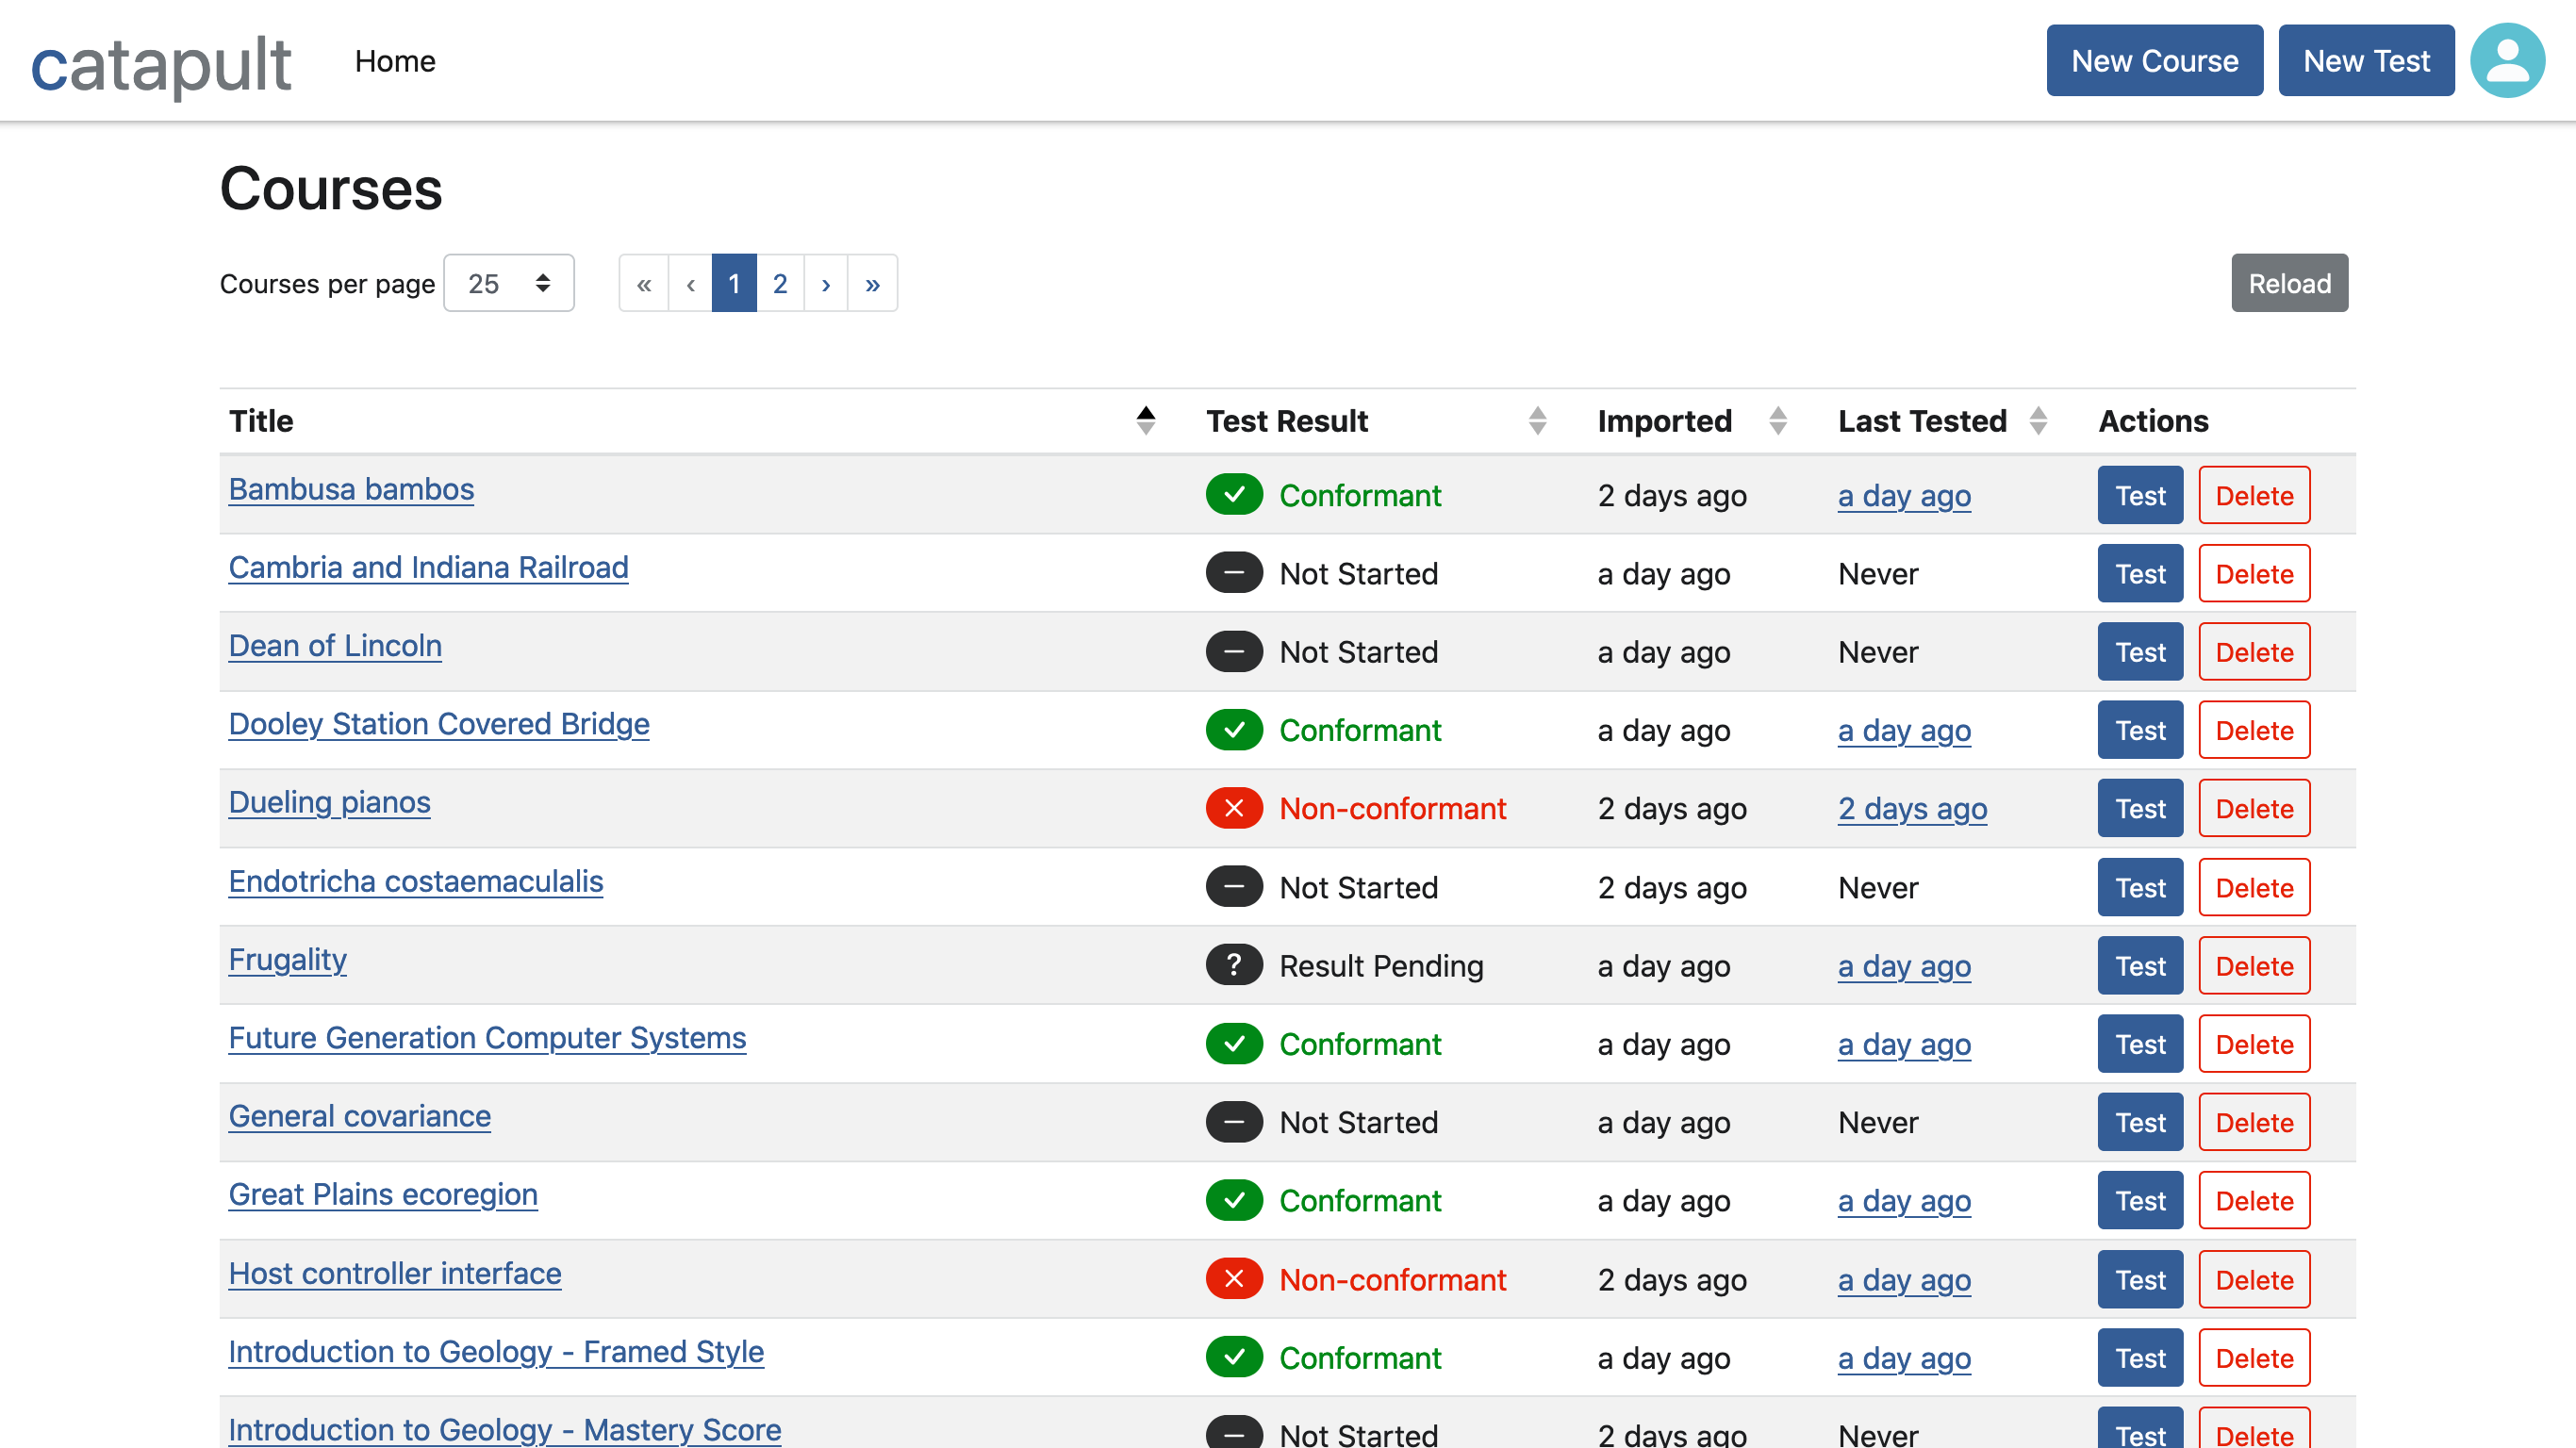
The list also has an “Actions” column with two buttons:
- Test: Clicking this button will begin a new test for the course.
- Delete: Clicking this button will open a confirmation message with a warning that deleting a course will also delete all associated test data, and options to continue or cancel.

Above the list itself, you’ll find a drop-down selector to control how many courses appear on each page. If more than the selected number of courses have been imported, a page selector will appear next to the drop-down. To the right of the paging controls there is a “Reload” button that will refresh the course list with the most up-to-date information from the server.
New Course
Accessed by: clicking the “New Course” button on the navigation bar.
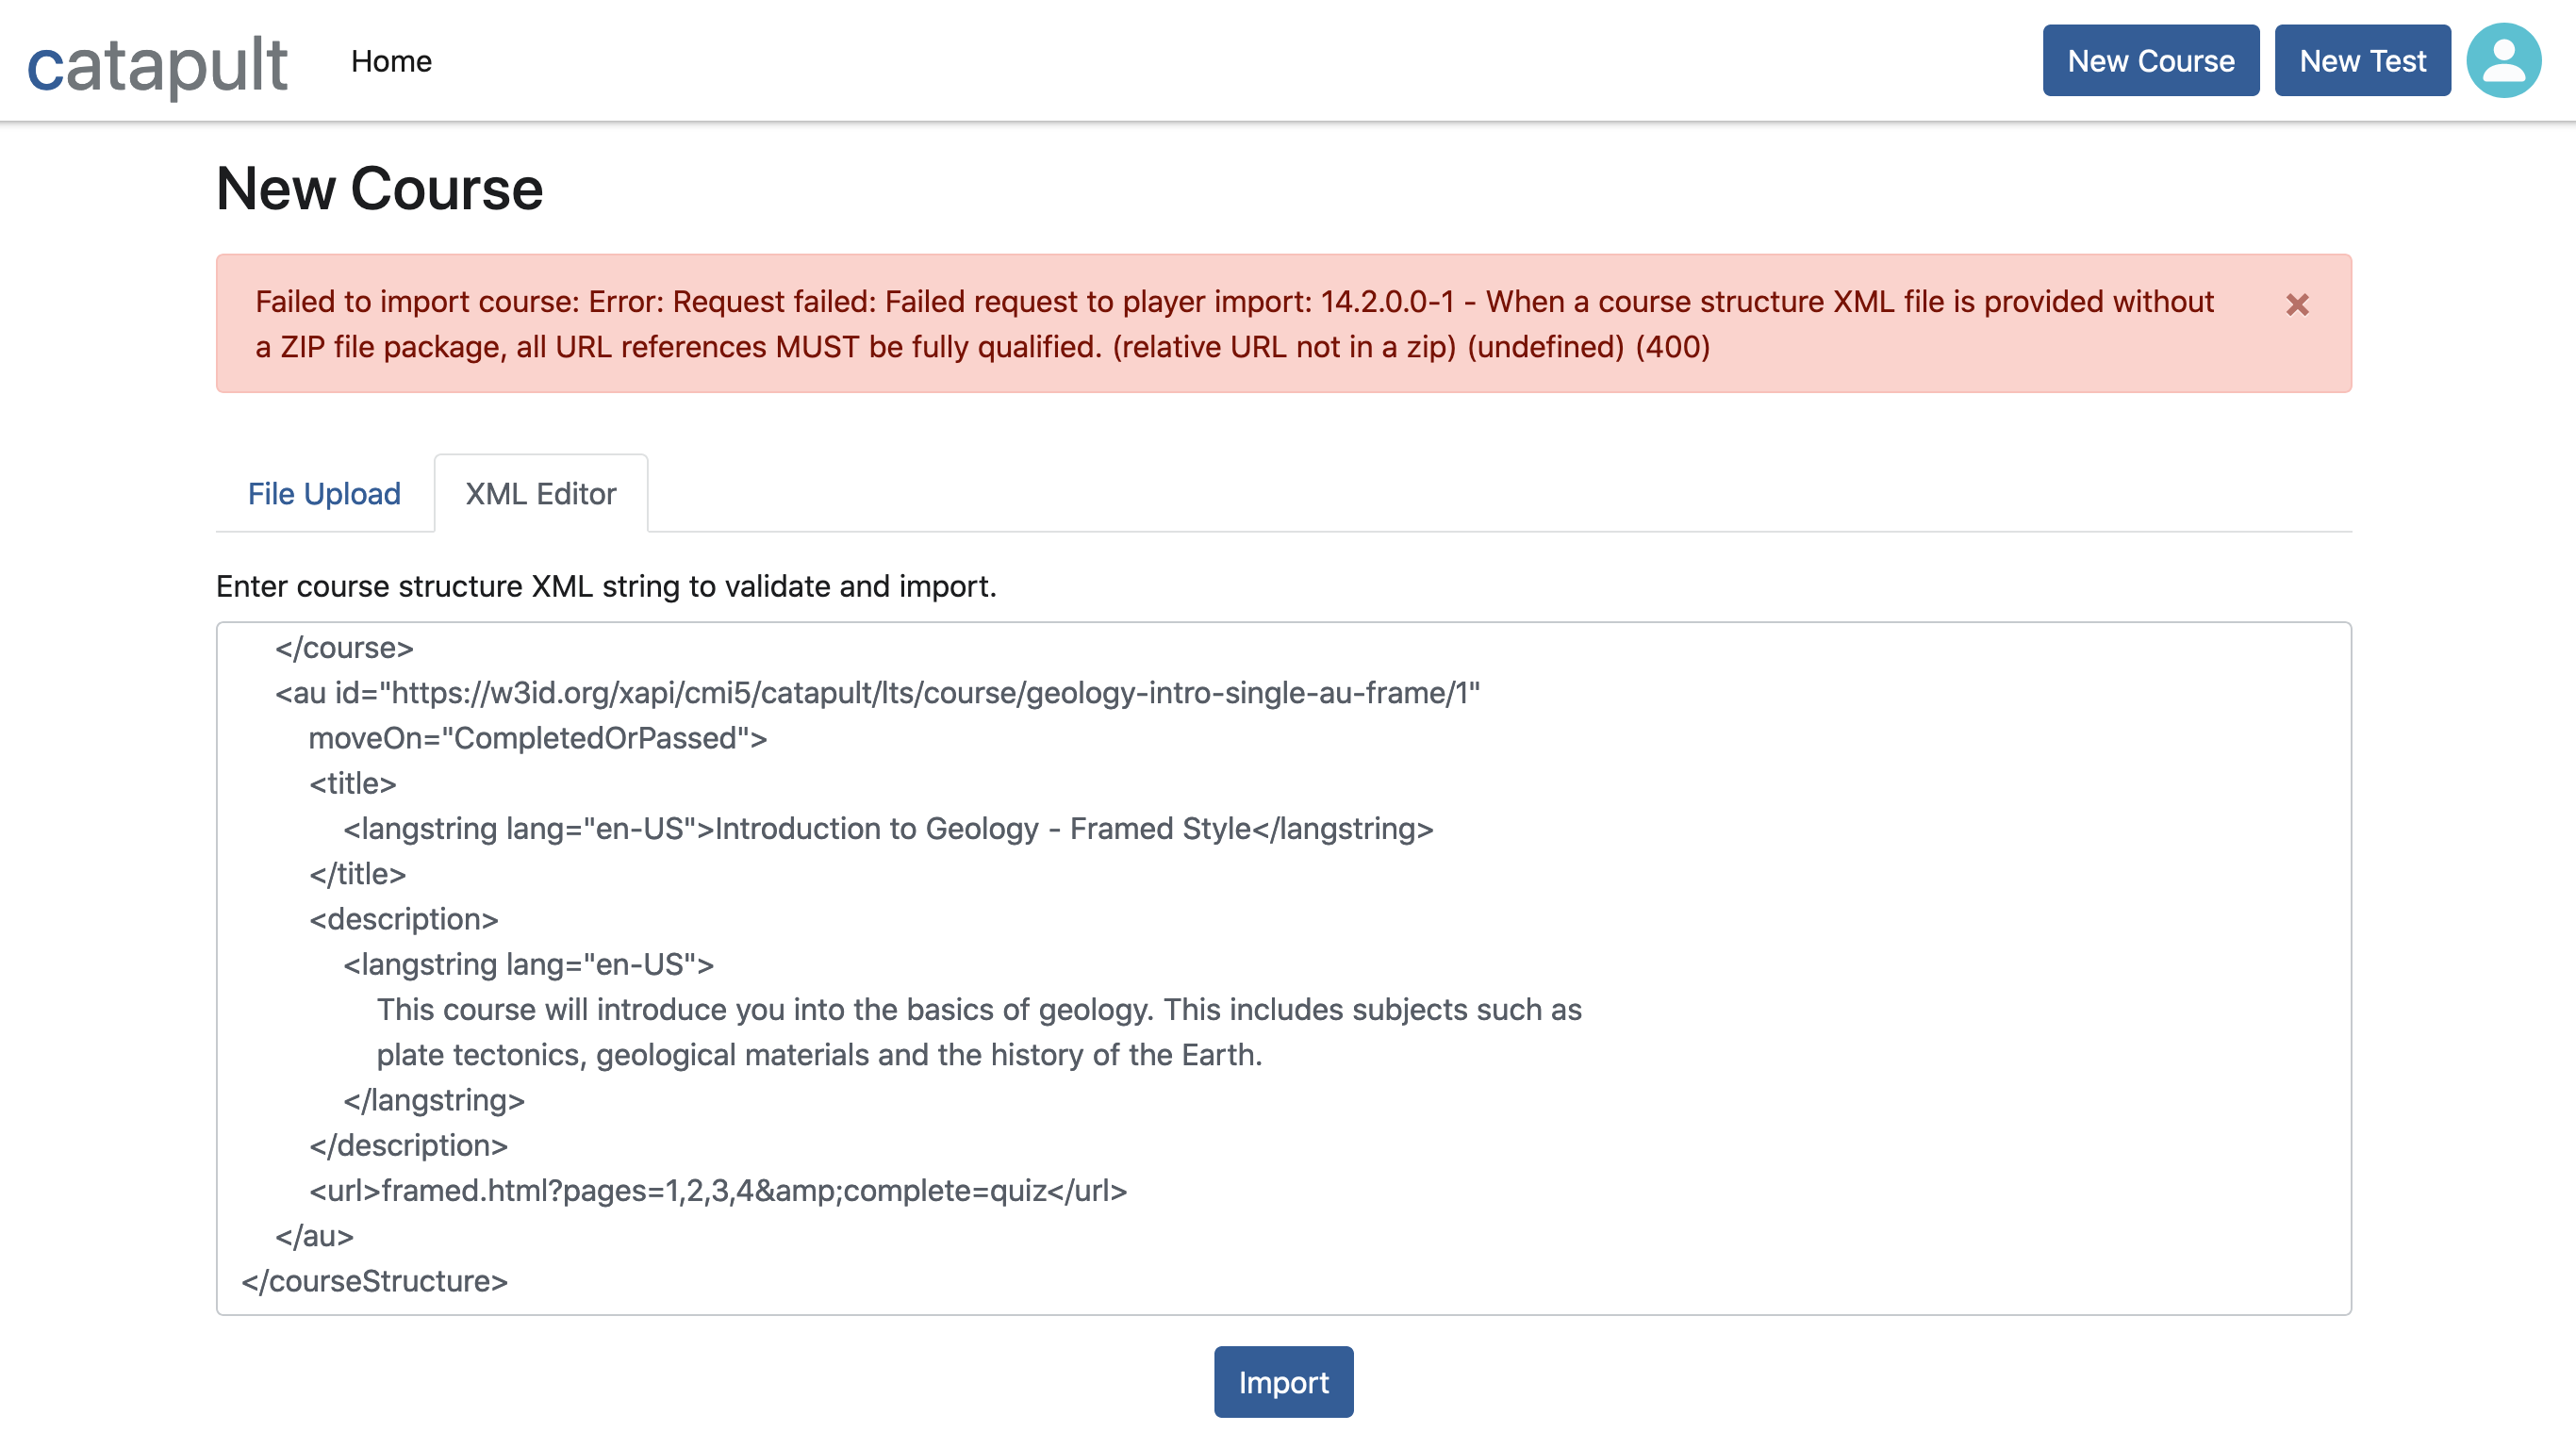
The New Course page has two tabs, one for each method of importing courses into the CTS.
The File Upload tab: This method is described in the tutorial. The cmi5 specification describes the types of files that may be imported (Section 14.0 Course Package). In summary, the file must be a standalone XML file, or a ZIP file with a cmi5.xml file in its root directory. The ZIP file may optionally contain other course assets as well.
If there is anything wrong with the uploaded file, or if the course structure is invalid, the CTS will let you know with an error message.
The XML Editor tab: With this method, you can copy and paste course structure XML from another application (say, a text editor) into a text field, then click the “Import” button. If the XML isn’t valid, you’ll see an error message describing the problem, which you can then correct right in the CTS. Note: When you import a course using the XML editor, all AU launch URLS must be fully qualified.
New Test
Accessed by: clicking the “New Test” button on the navigation bar and selecting a course from the drop-down menu, clicking the “Test” button next to a course in the Course List, or clicking the “Test” button on a Course Details page.
To resume a test that you’ve previously started, see Course Details.
At the top of the New Test page, you’ll see a heading with the course’s title, followed by its LMS ID (generated by the CTS) and Publisher ID (from the course structure).
Beneath the heading and metadata is a form where you can provide values for the xAPI actor that will be used for the test registration. Clicking the “Randomize” button will populate the form with valid values. If you wish to provide your own values, the fields are as follows:
- Name: This is supposed to be the full name of the actor, but you may provide any value that you like. The name will appear in the test list on the Course Details page.
- Account homepage: For cmi5 launches from a traditional LMS, this would be the canonical homepage URL for the system that the learner signs into. You may provide any valid URI.
- Account name: A unique ID or username for the account. As with the “Name” field, you may provide any value that you like.
After clicking the “Continue” button, you’ll be taken to the Test Details page for your new test.
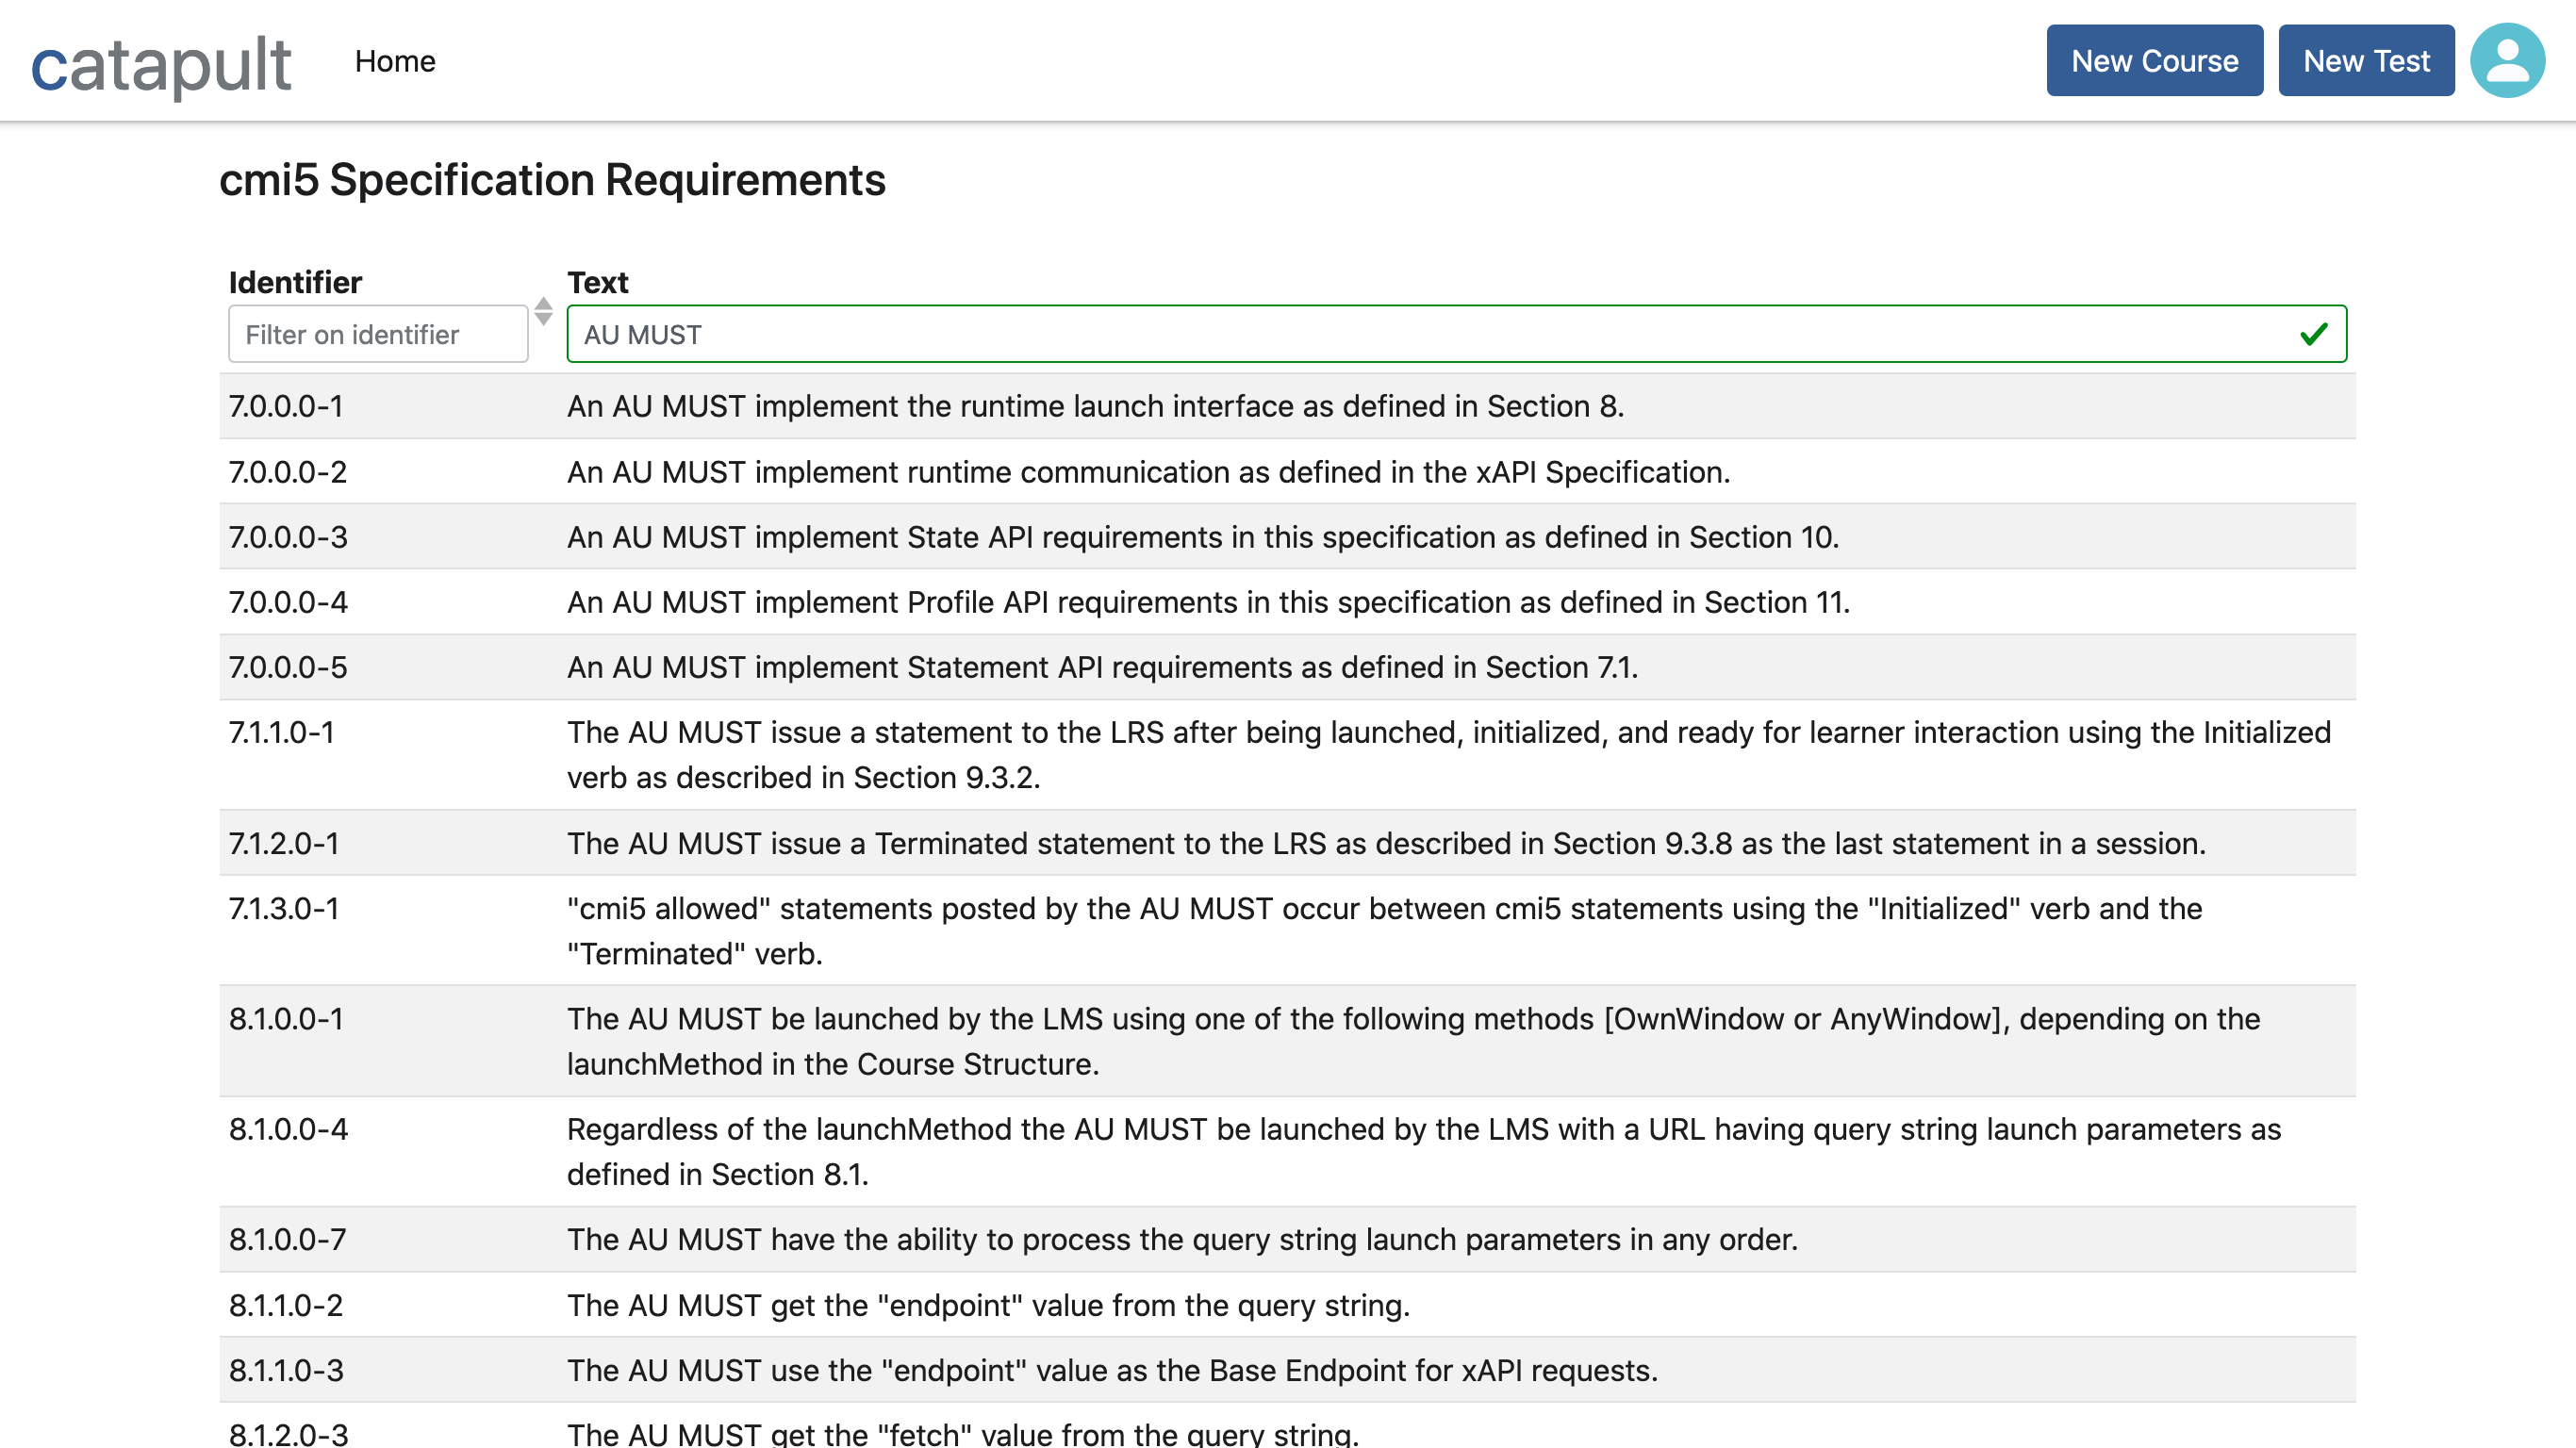
Requirements List
Accessed by: clicking the round “User” button on the navigation bar, then selecting “Spec Requirements” from the drop-down menu.
The Requirements List provides in-app access to the cmi5 specification requirements. Each requirement has an identifier based on the specification section that it comes from. For example, requirements 8.1.1.0-1 through 8.1.1.0-3 have to do with the “endpoint” launch parameter that is defined in section 8.1.1.
You may filter the list by identifier or by text.
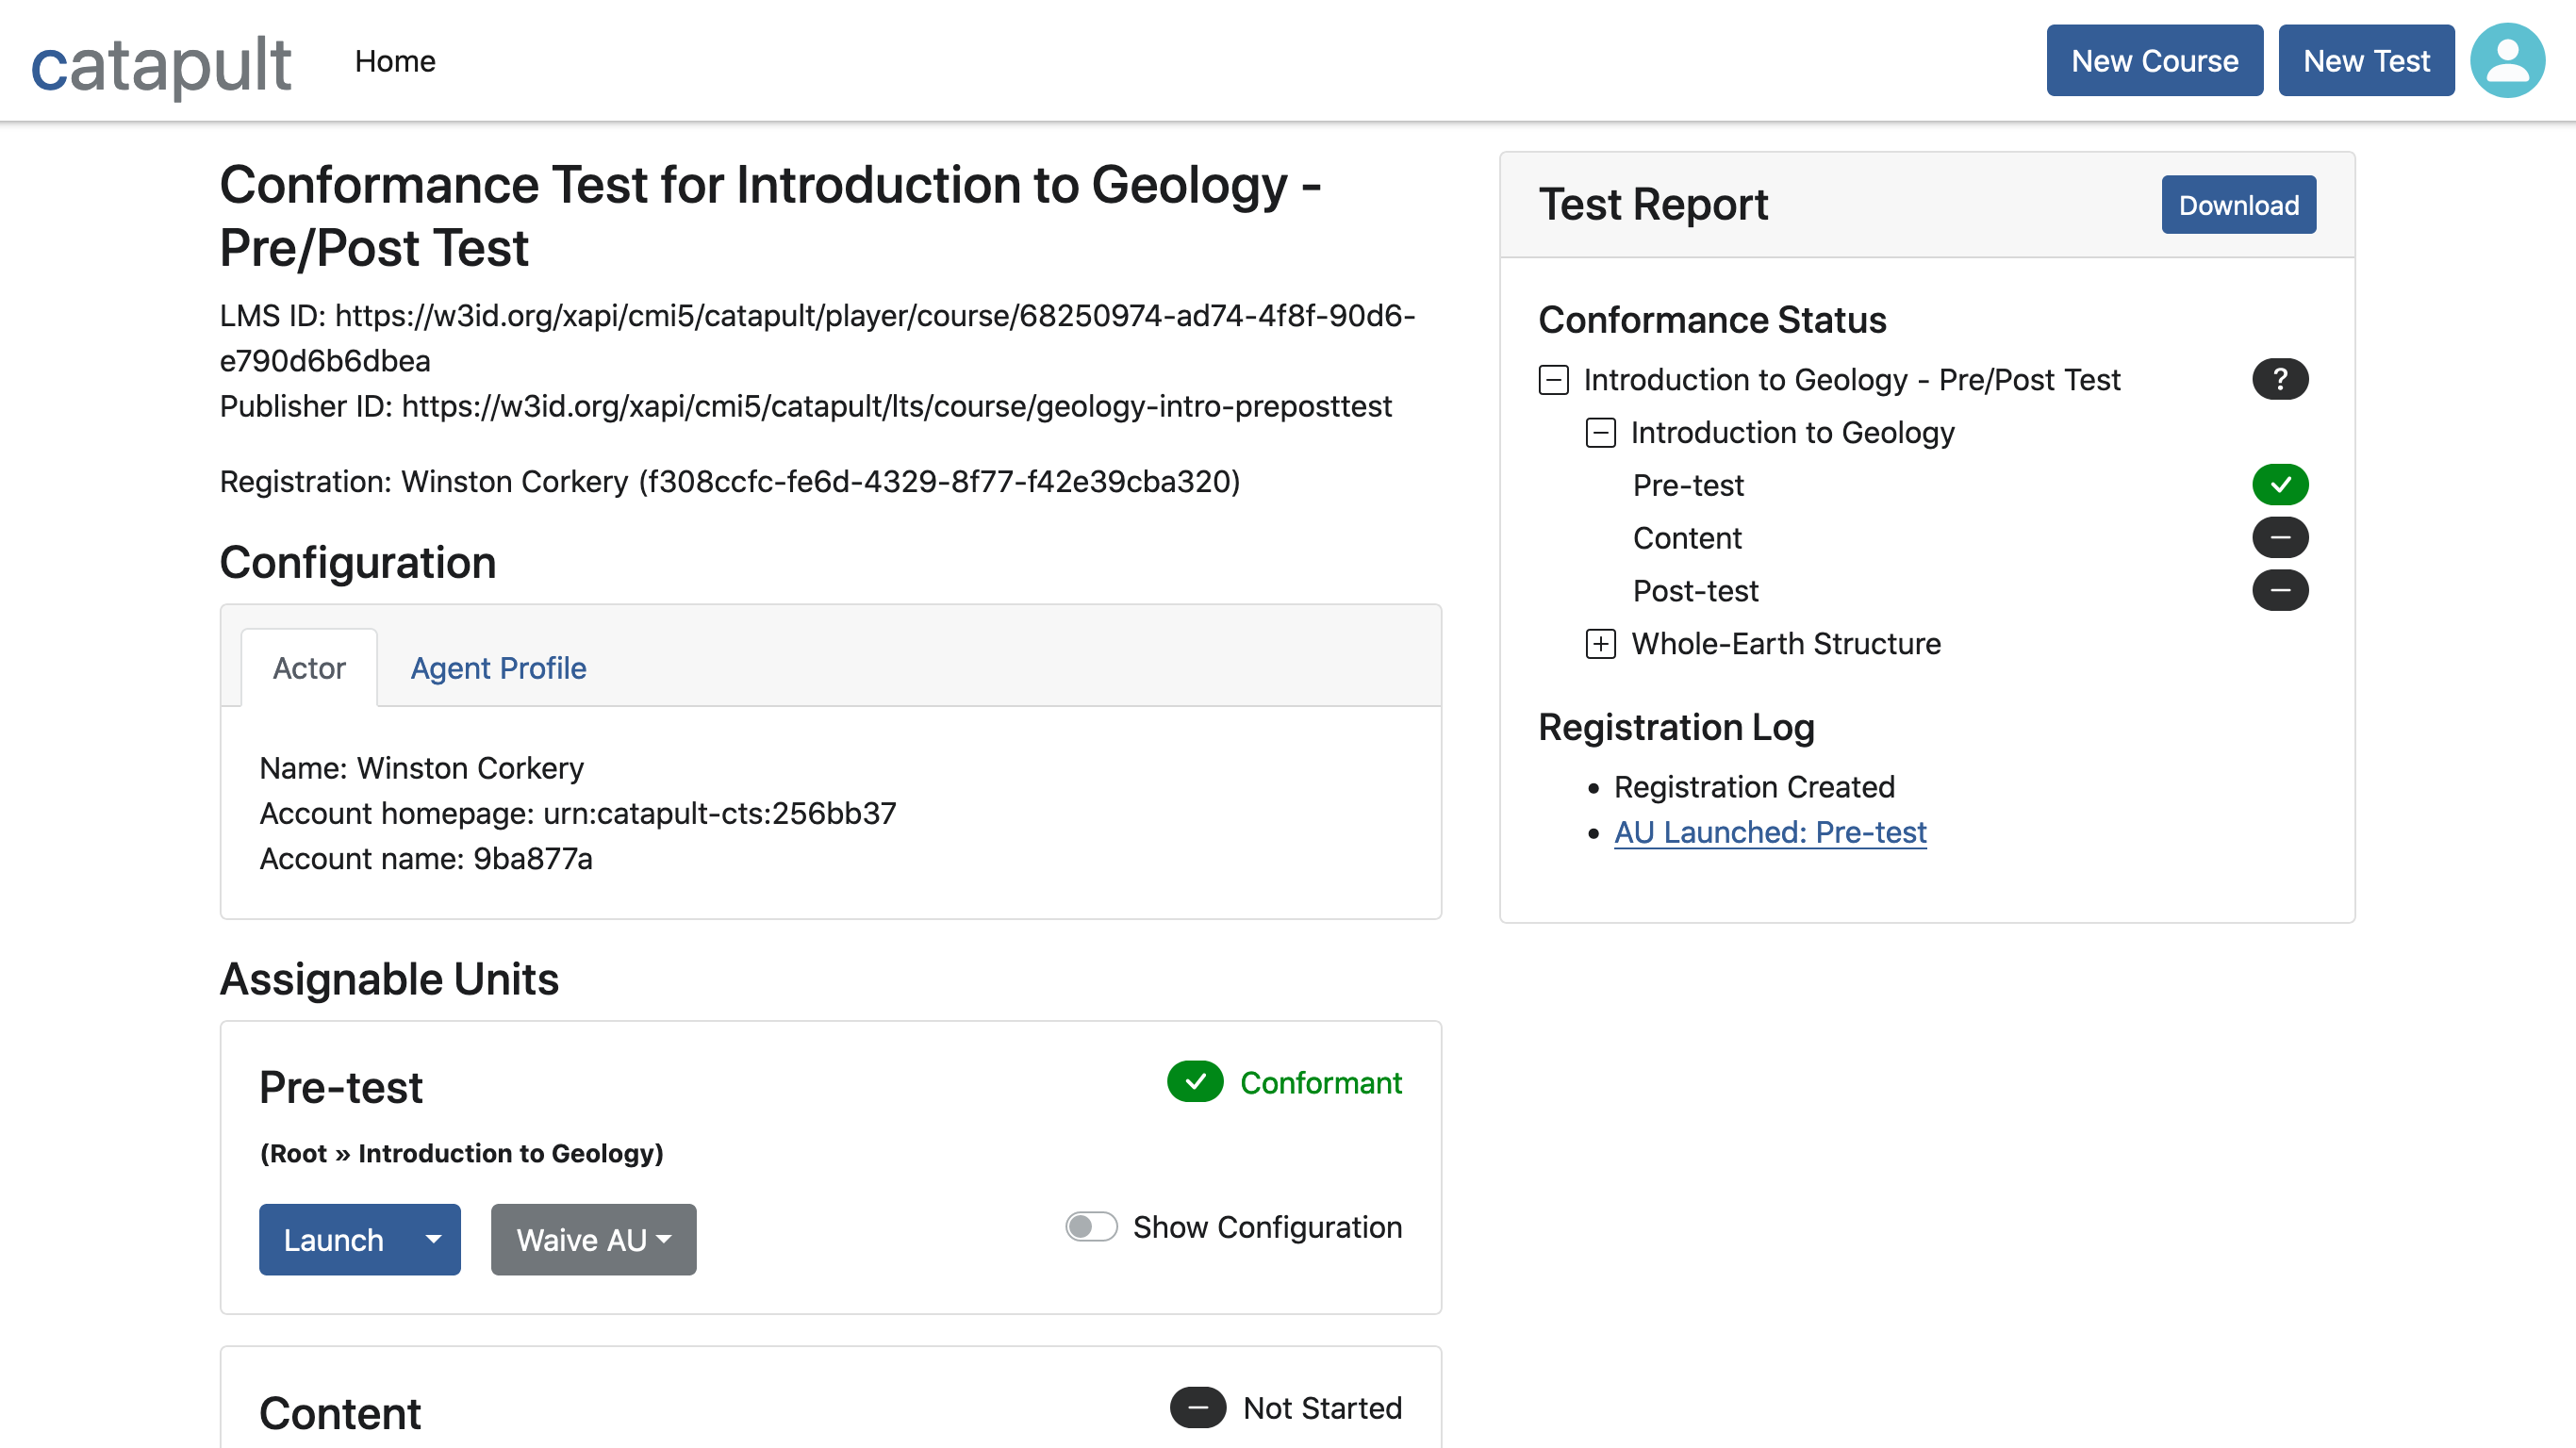
Test Details
Accessed by: creating a new test, or resuming an existing test from the Course List or a Course Details page.
The Test Details page is where you can launch AUs and view detailed information about a course’s cmi5 conformance. The left column of the page contains metadata and the assignable units that make up the course. The right column contains a test report showing the conformance status of each course component, and a log of the test events, such as AUs being launched.
Configuration
The Configuration section has two tabs. The first shows information about the xAPI Actor for this test’s registration, which was set when the test was created (see New Test). The second tab is for modifying the xAPI Agent Profile, which for cmi5 courses contains the learner’s language and audio preferences.
- Language preference: A comma-separated list of RFC 5646 Language Tags in order of preference.
- Audio preference: “On” if audio should be on at course startup, or “Off” if audio should be off.
Underneath those two form fields are buttons to save, clear, or reload the values from the LRS.
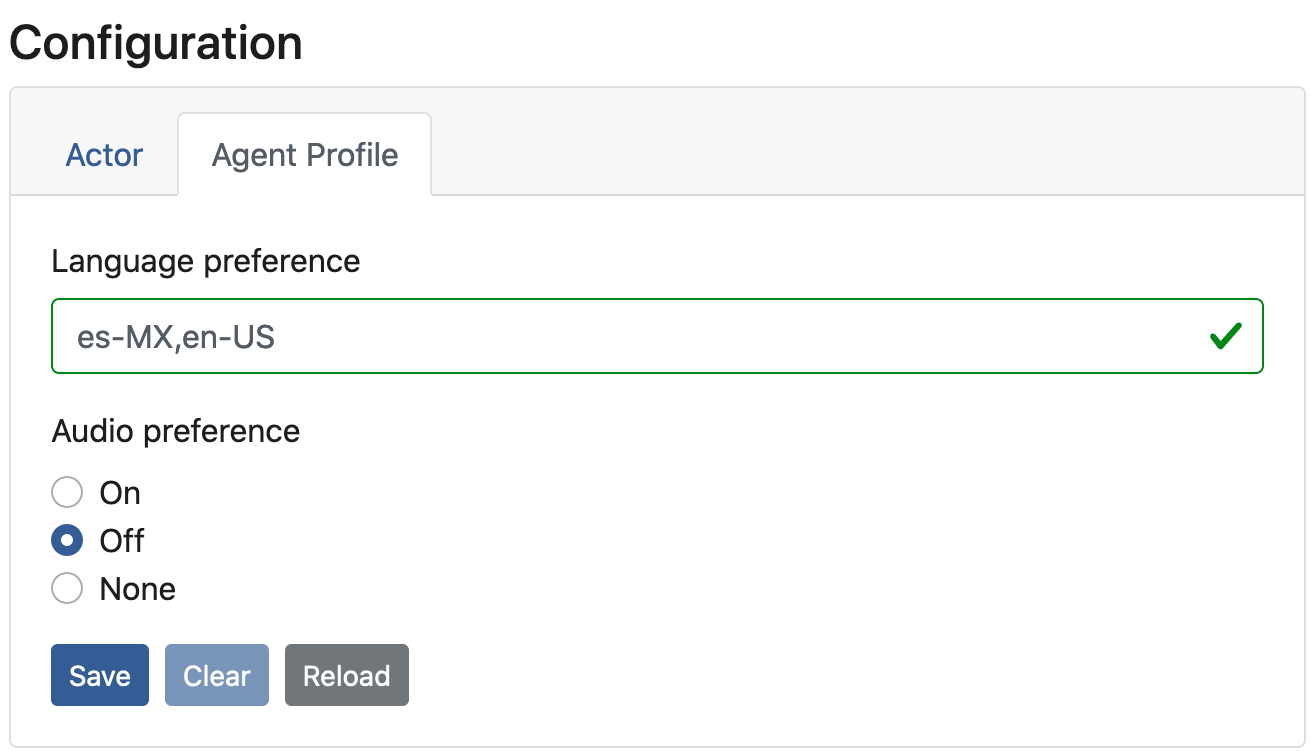
Note: the cmi5 specification requires both values to be present in the Agent Profile, so the “Save” button will be disabled until a value is provided for both.
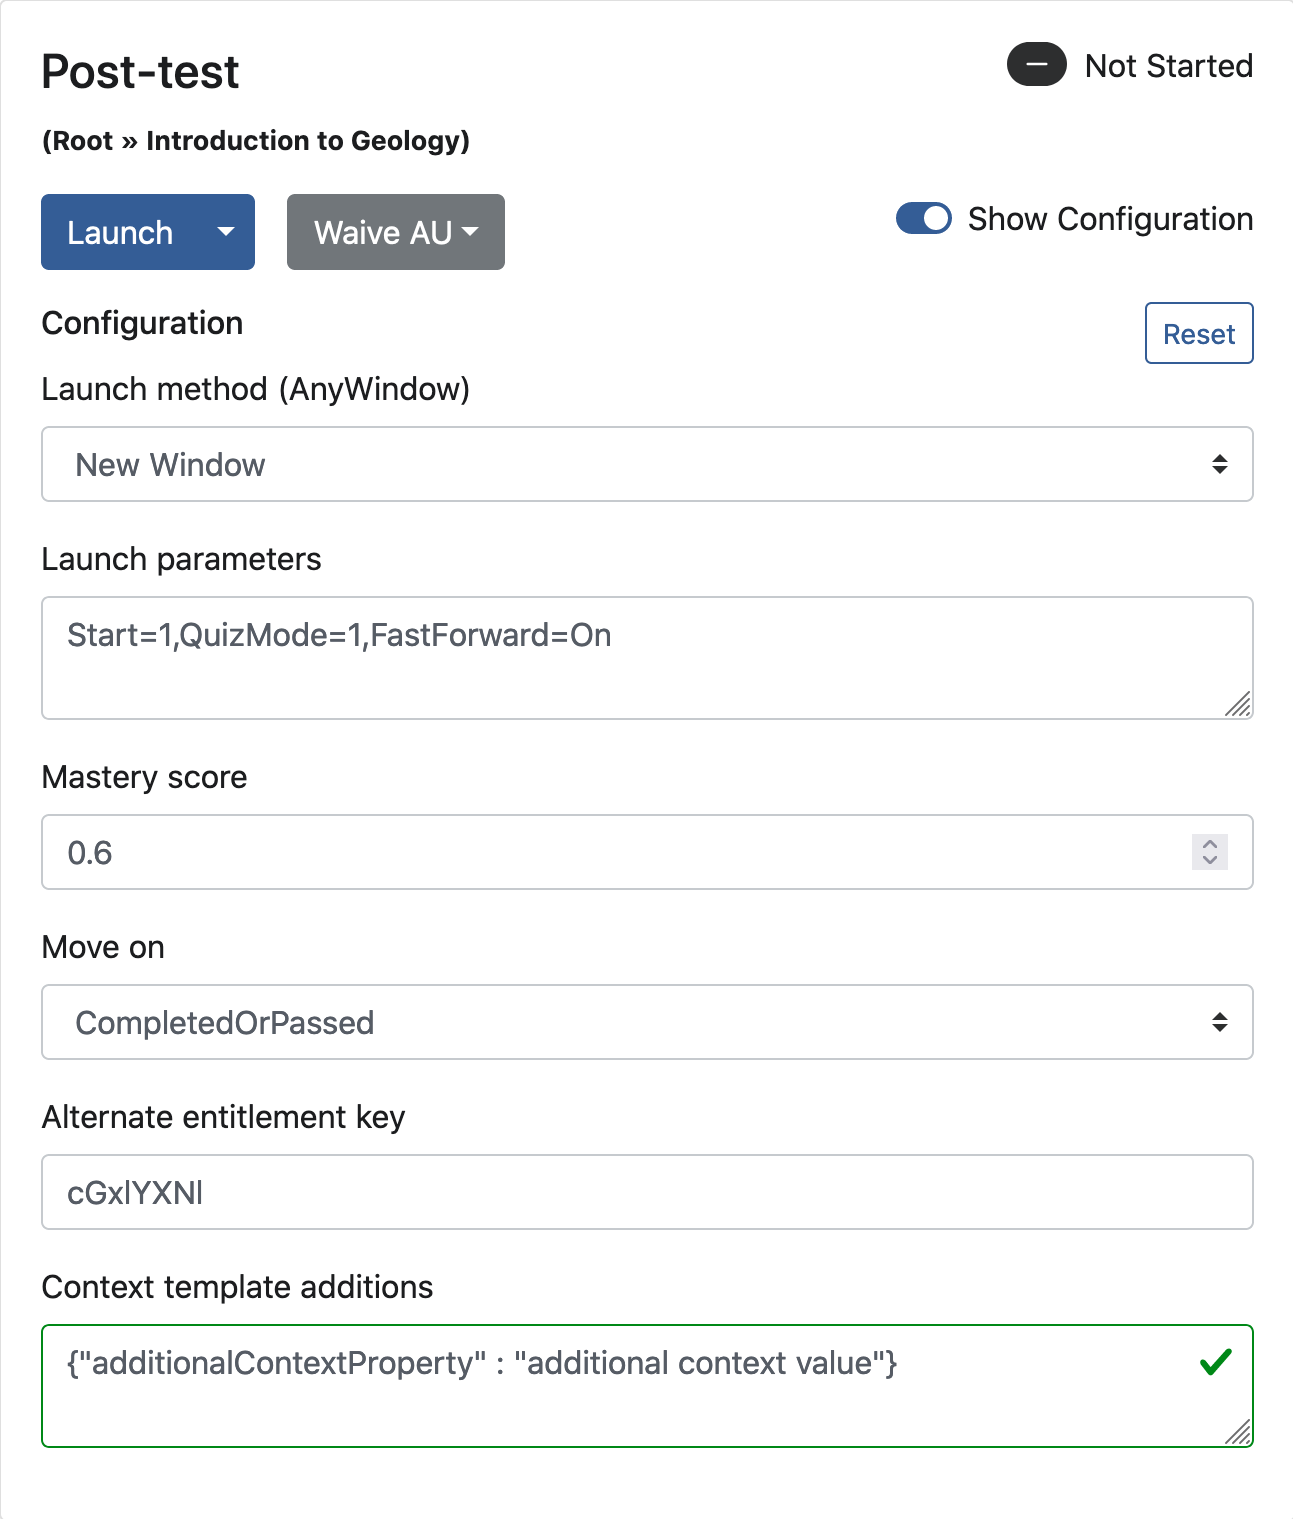
Assignable Units
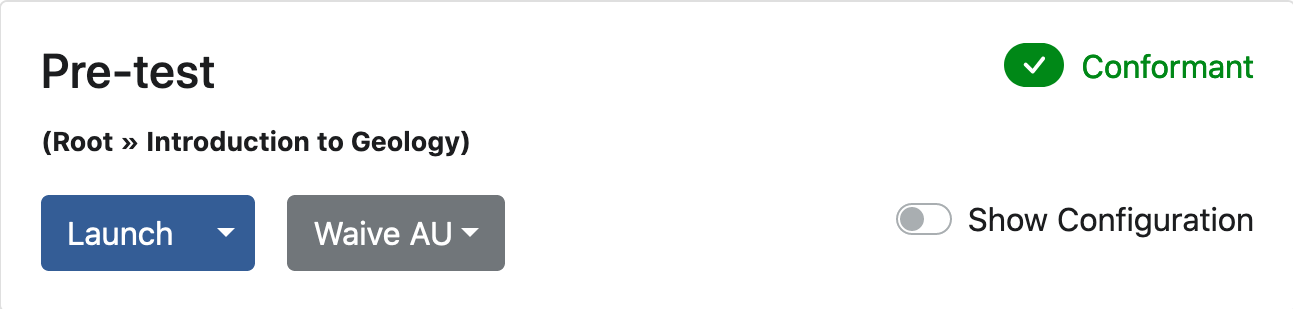
Below the Configuration section is the Assignable Units section. Each assignable unit in the course has a card with the AU’s title as a heading. The other information and controls in the card are as follows:
- Test Result: In the upper right corner of the card. This will initially be “Not Started”, and will change after the AU is launched.
- Block Path: If the course makes use of blocks, then the path to this AU from the course root is shown underneath the title. That way you can distinguish between AUs with similar titles in different blocks.
- Launch Button: Clicking this button will begin a new AU Session. Clicking the triangle on the right side of the button will open a drop-down menu to select different cmi5 launch modes: normal (the default), browse, or review.
- Waive Button: Clicking this button will issue a “Waived” statement for the AU. A drop-down menu will open, so that you may select a reason for waiving the AU: “Tested Out”, “Equivalent AU”, “Equivalent Outside Activity”, or “Administrative”. Note: waiving an AU does not affect its conformance test result. You must still launch the AU and satisfy its moveOn criteria to get a “Conformant” result.
There is also one more control in the AU card:
- Show Configuration: Clicking this toggle will open a form with fields for the course structure settings that you may override, and a “Reset” button to undo any changes.
The available settings are:
- Launch method: (launchMethod) This setting controls whether the AU is launched in an iframe in the same window as the CTS, or in a new window. It is only available when the AU’s launchMethod value in the course structure is either “AnyWindow” or unspecified.
- Launch parameters: (launchParameters) Additional data that the AU may make use of at run time. The acceptable values for this setting are defined by the course designer.
- Mastery score: (masteryScore) The score used to determine passing or failure of judged activity in the AU. This should be a decimal number between 0.0 and 1.0 (inclusive).
- Move on: (moveOn) The criteria used to determine whether the AU has been sufficiently satisfied. Please note that in order for the CTS to reach a “Conformant” result for a test, all AUs have to be satisfied. If you change this value to “Passed”, but the AU only issues “Completed” statements, then you’ll not be able to verify the AU’s conformance.
- Alternate entitlement key: (entitlementKey.alternate) Some AUs may require the LMS to provide an agreed upon entitlement key in order to be launched. If you are testing such content, this is where you can provide the entitlement key.
- Context template additions: (contextTemplate) The cmi5 specification requires the LMS to provide a template for the context property of any xAPI statements that the AU issues. This template must include a session ID and a publisher ID for the activity, but may also include additional values. If you wish to do so, you may provide a JSON object for this purpose.
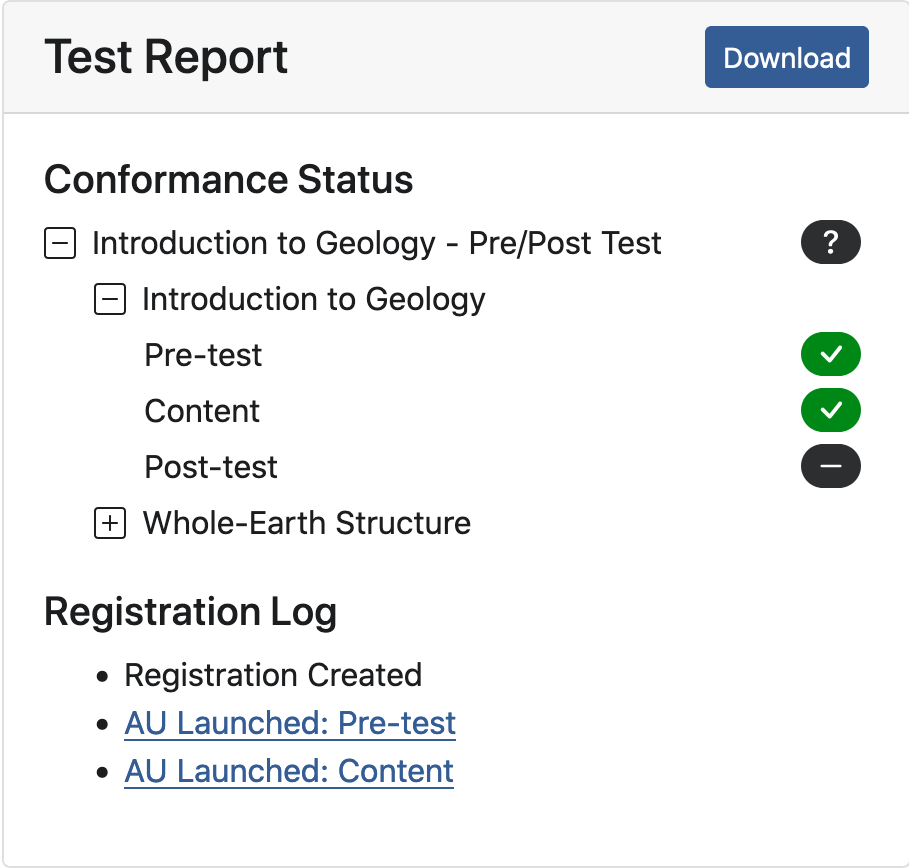
Test Report
At the top of the Test Report is a “Download” button. Clicking it will download the test’s JSON report file, which you’ll want to do after you’ve finished testing the entire course.
The body of the Test Report has two sections. The first shows the conformance status of the course and each of its AUs in a tree view. Click the “+” icon next to the course title to show its AUs and blocks. The icon will change to “-“, and you can click it again to hide the course’s contents. Likewise, you can open and close any blocks inside the course to view their contents.
The second section is the Registration Log, and it contains a summary list of events during the test session. In particular, an entry is added to the log each time an AU is launched, with a link to a record of that AU session.
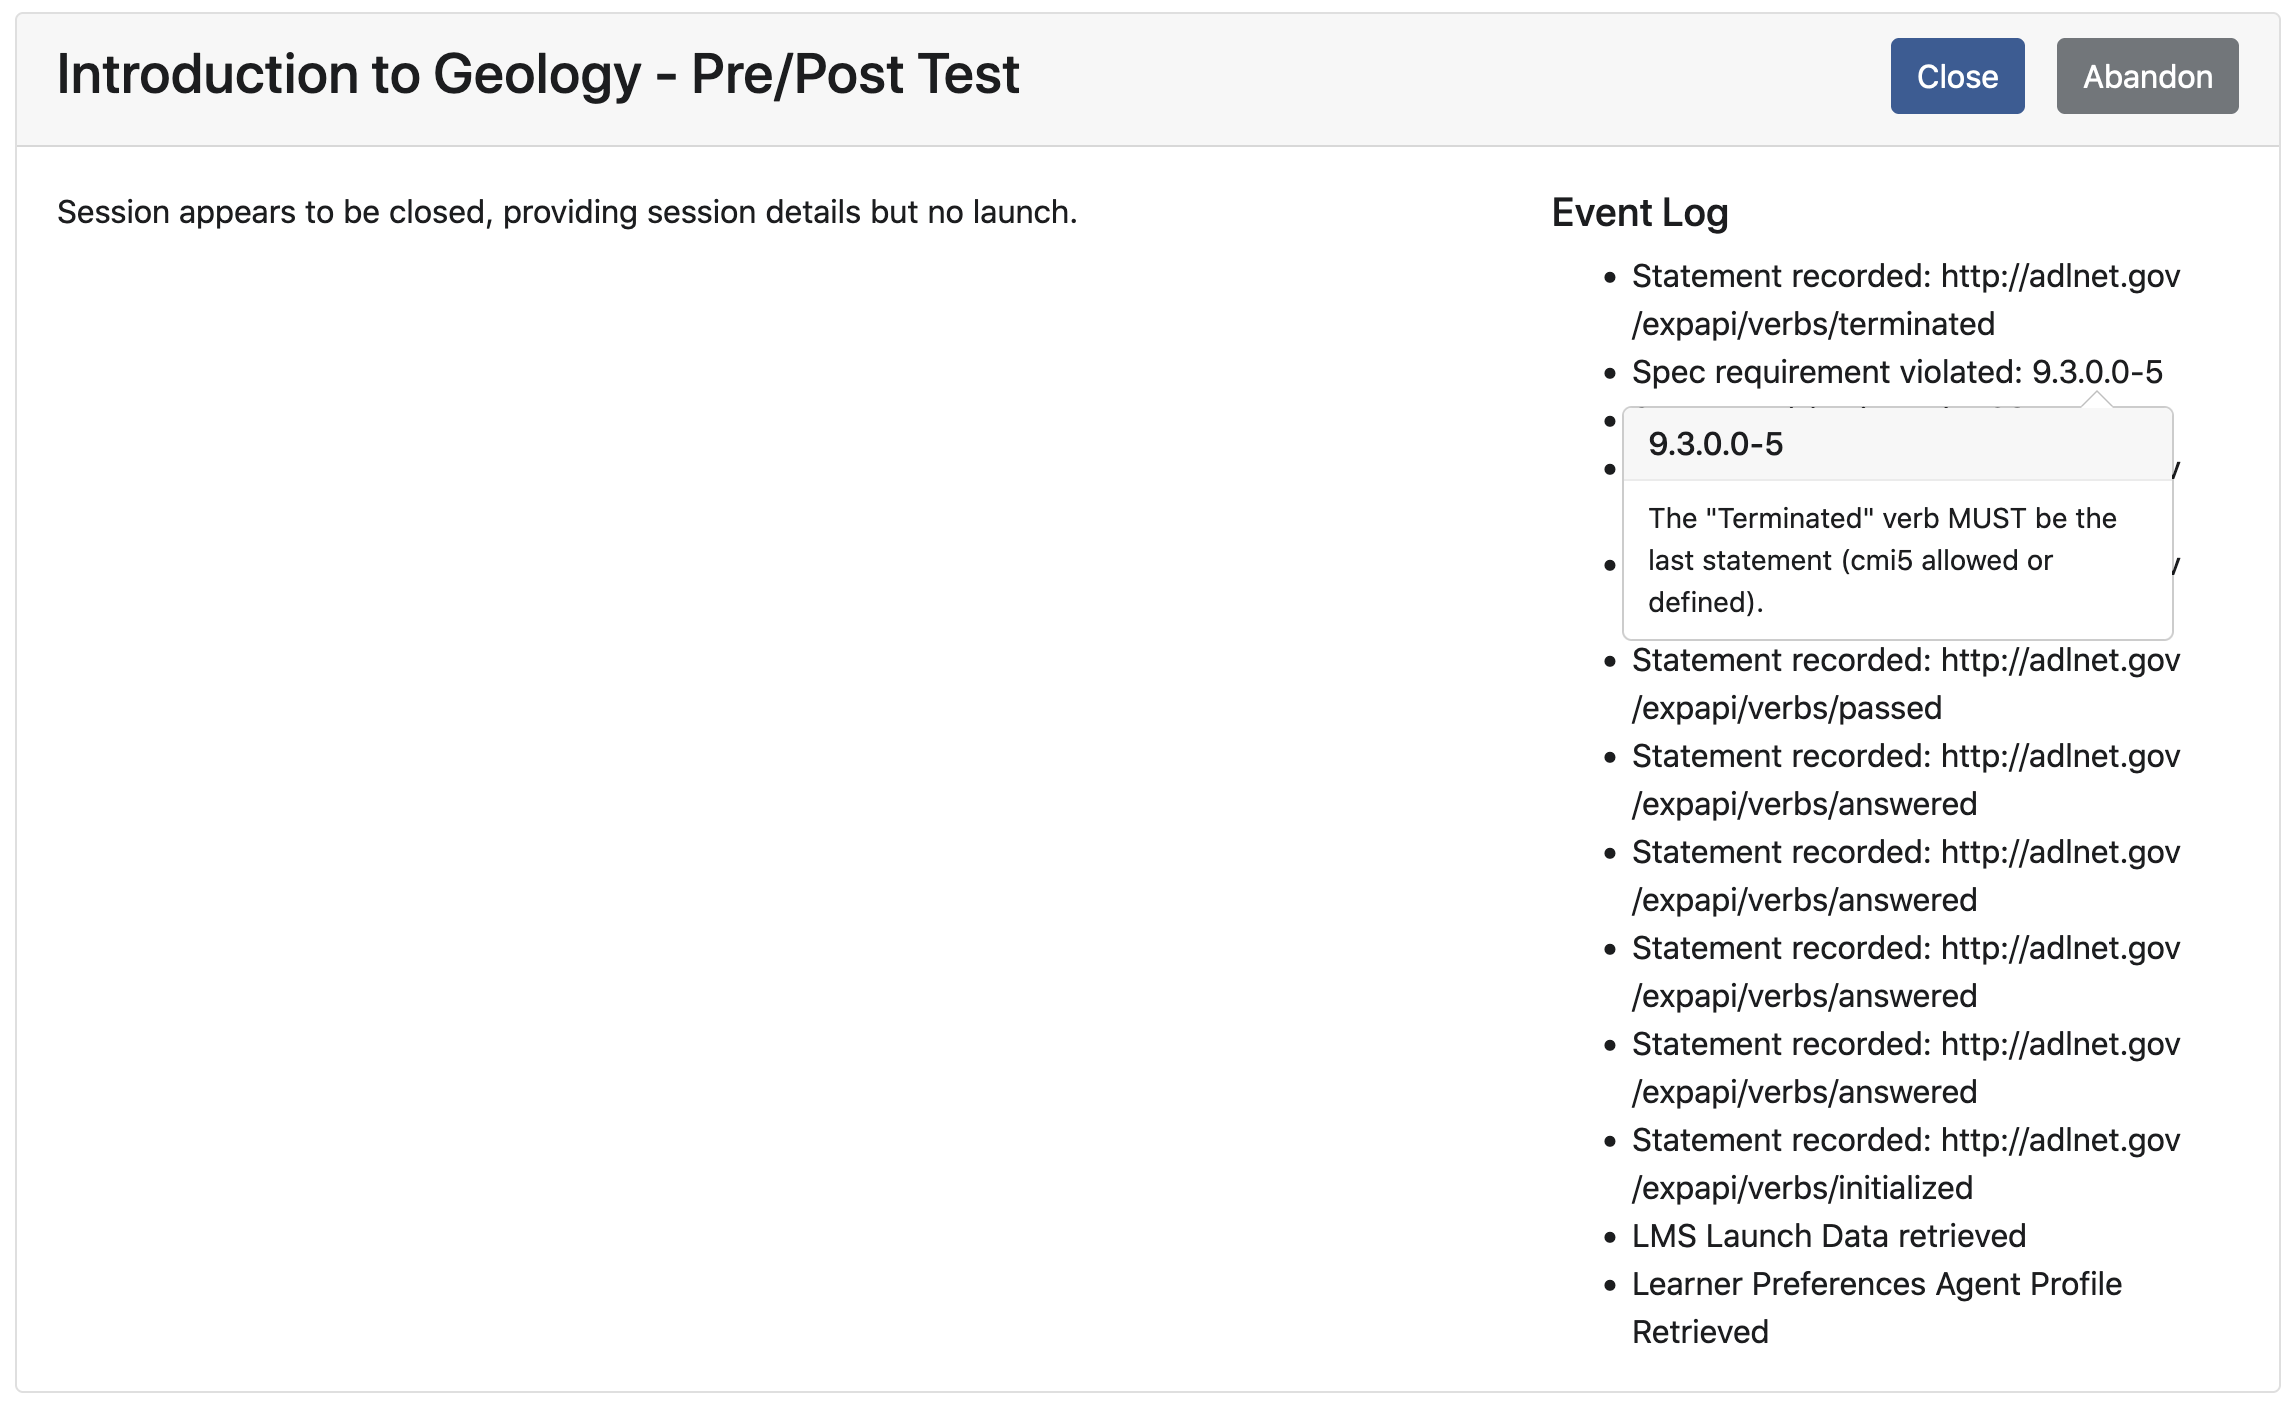
AU Session
The AU Session page contains a content area for AUs that are launched in an iframe, and an event log that shows a running summary of the xAPI statements and other events that happen during the session. Above the event log are two buttons:
- Close: Clicking this button will return you to the Test Details page. If the AU is still open, it will be unloaded.
- Abandon: Clicking this button will issue an “Abandoned” statement, and any further xAPI statements issued by the AU will be rejected.
You may revisit an AU session without re-launching the AU by clicking on its log entry in the Test Report. That way, you can review the session’s event log.